API
Requisiti
Le funzioni di base dell'API sono disponibili nel modello Basic per un uso non commerciale. Per un uso commerciale e per un rate limit più elevato è necessaria la licenza Professional.
Descrizione dell'API
L'interfaccia API consente un accesso semplice e sicuro ai dati dei dispositivi smart-me e della piattaforma. Tramite questa interfaccia è possibile richiamare in tempo reale dati di consumo, stato dei dispositivi, valori di misura e altre informazioni e integrarli in sistemi esterni.
Qui sono documentate tutte le chiamate API, che possono essere provate direttamente.
Codici Obis
I codici Obis sono identificativi standardizzati per i valori di misura nei contatori di energia. Ogni codice Obis descrive in modo univoco quale valore viene misurato (ad es. consumo di corrente attuale, lettura del contatore, tensione per fase).
Suggerimento per la decodifica: su questo sito web puoi consultare la sistematica della codifica. Se lì clicchi su un mezzo, vedi che cosa rappresentano le singole cifre del codice.
DeviceID
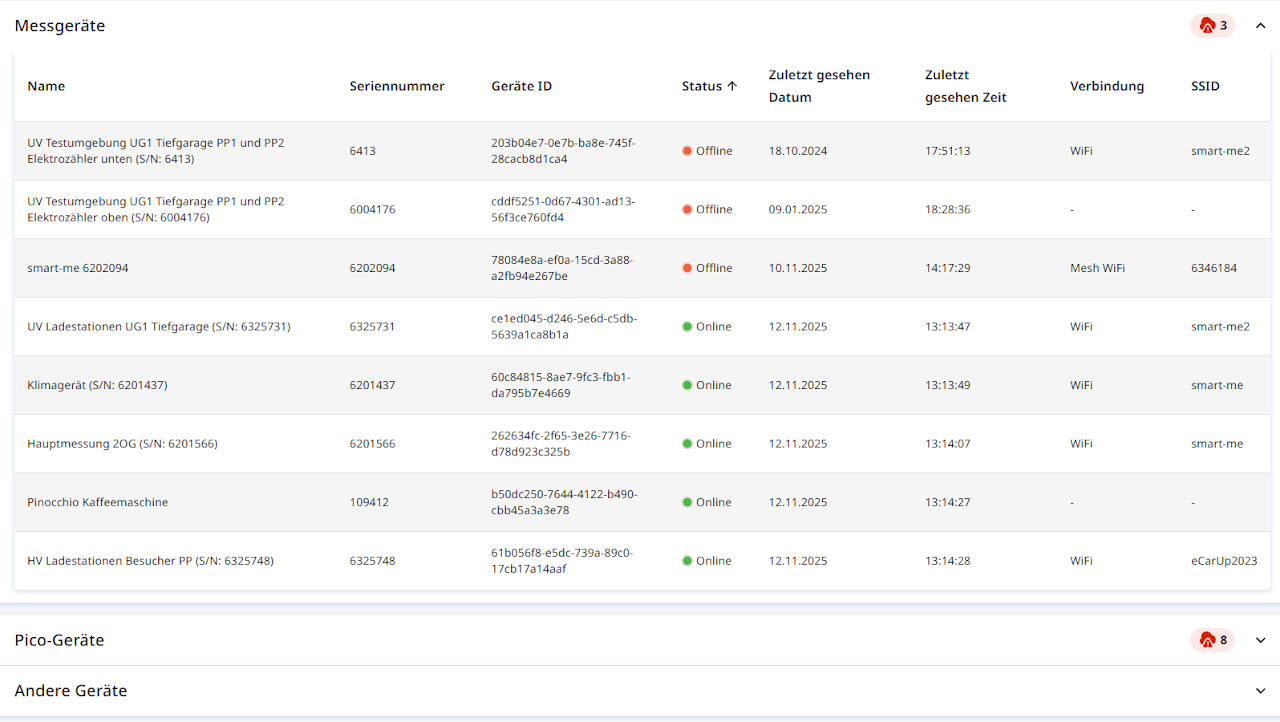
La DeviceID è un'assegnazione univoca a un punto di misura, indipendente dal nome. Viene indicata sia nell'API sia nella Salute del sistema (Systemgesundheit) (funzione Professional)
Autenticazione
Basic Auth (non consigliato / obsoleto)
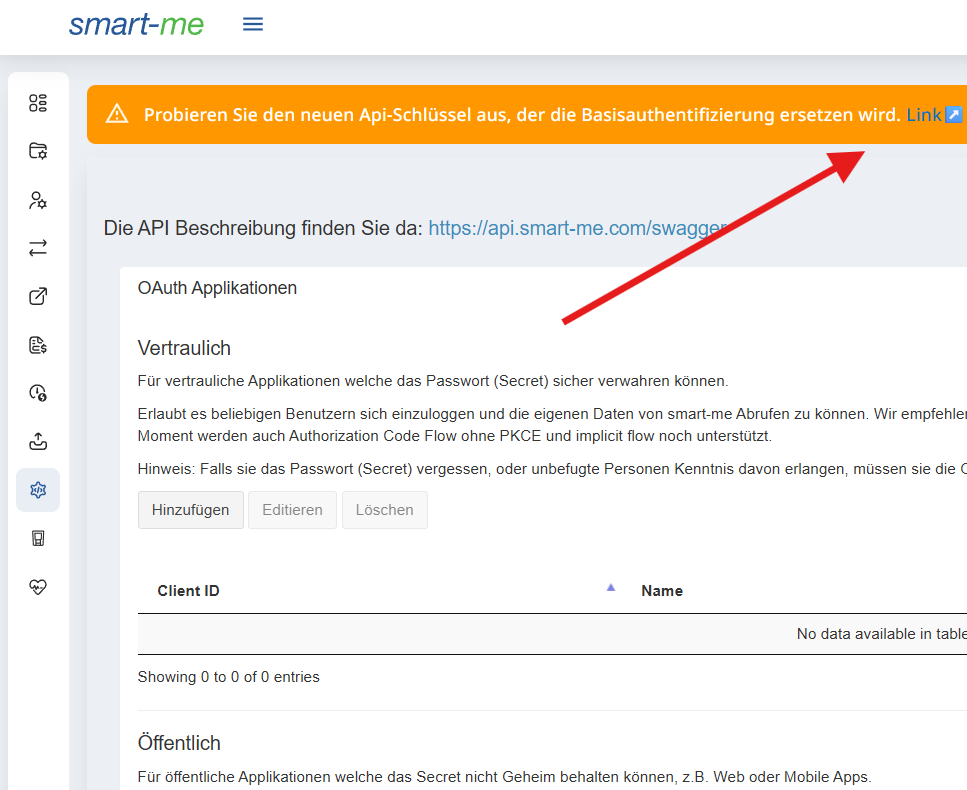
Attualmente è possibile utilizzare Basic Auth come autenticazione. Questa opzione verrà però rimossa a medio termine per mancanza di sicurezza. In alternativa sono disponibili le API Key. Il client secret è username:password codificato in Base64.
Ogni chiamata all'API deve contenere l'autenticazione nell'header HTTP: Authorization: Basic <client secret>
Esempio: curl -X "PUT" "https://api.smart-me.com/Devices/6a7fae30-c598-4778-8f1f-a14620550274" -H "accept: */*" -H "Authorization: Basic d2VyX2Rhc19sZXNlbl9rYW5uOmhhdF96dXZpZWxfemVpdA=="
API Key (consigliato)
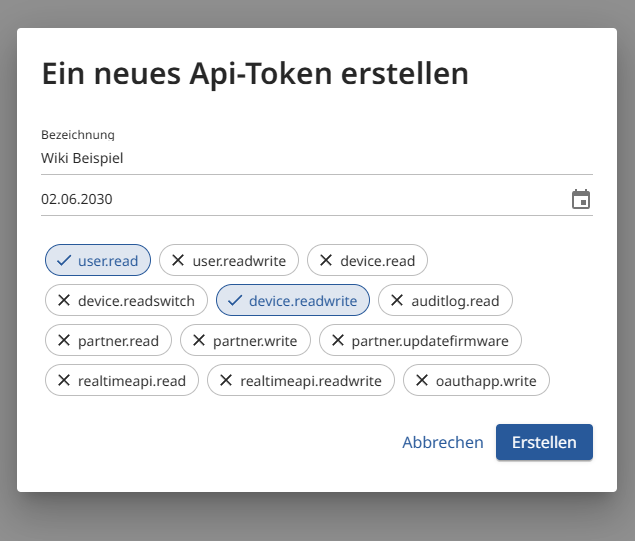
Le API Key consentono un'autenticazione simile a Basic Auth per un accesso semplice a un account. In questo caso si crea una Key nel portale smart-me e le si assegnano determinate autorizzazioni (Claims (vedi sotto)). La Key può poi essere aggiunta nell'header HTTP in modo analogo al secret di Basic Auth.
Ogni chiamata all'API deve contenere l'autenticazione nell'header HTTP: Authorization: ApiKey <api key>
Esempio: curl -X "PUT" "https://api.smart-me.com/Devices/6a7fae30-c598-4778-8f1f-a14620550274" -H "accept: */*" -H "Authorization: ApiKey MTRH5eUjFXV8U4i1viZF2jHNoUNsnDTx"
Le Key possono essere create nel portale web alla voce API, Api Keys:
Claims
Sia le ApiKey sia oAuth 2.0 supportano i Claims, per concedere solo autorizzazioni limitate.
Un elenco della corrispondenza tra endpoint e Claims è disponibile qui:
Claims
OAuth 2.0 (consigliato)
smart-me supporta il framework di autorizzazione OAuth 2.0. Le applicazioni esterne possono richiedere l'accesso a un account senza conoscerne le credenziali di accesso. Ulteriori informazioni sono riportate più sotto.
Informazioni su OAuth
smart-me supporta il framework di autorizzazione OAuth 2.0. Le applicazioni esterne possono richiedere l'accesso a un account senza conoscerne le credenziali di accesso.
Configurazione di OAuth nel portale smart-me
Il requisito per l'utilizzo di oAuth è un account con il modello di licenza professional. Se non disponi ancora di un account con il modello di licenza Professional, devi acquistare 1 licenza.
-
A sinistra su API
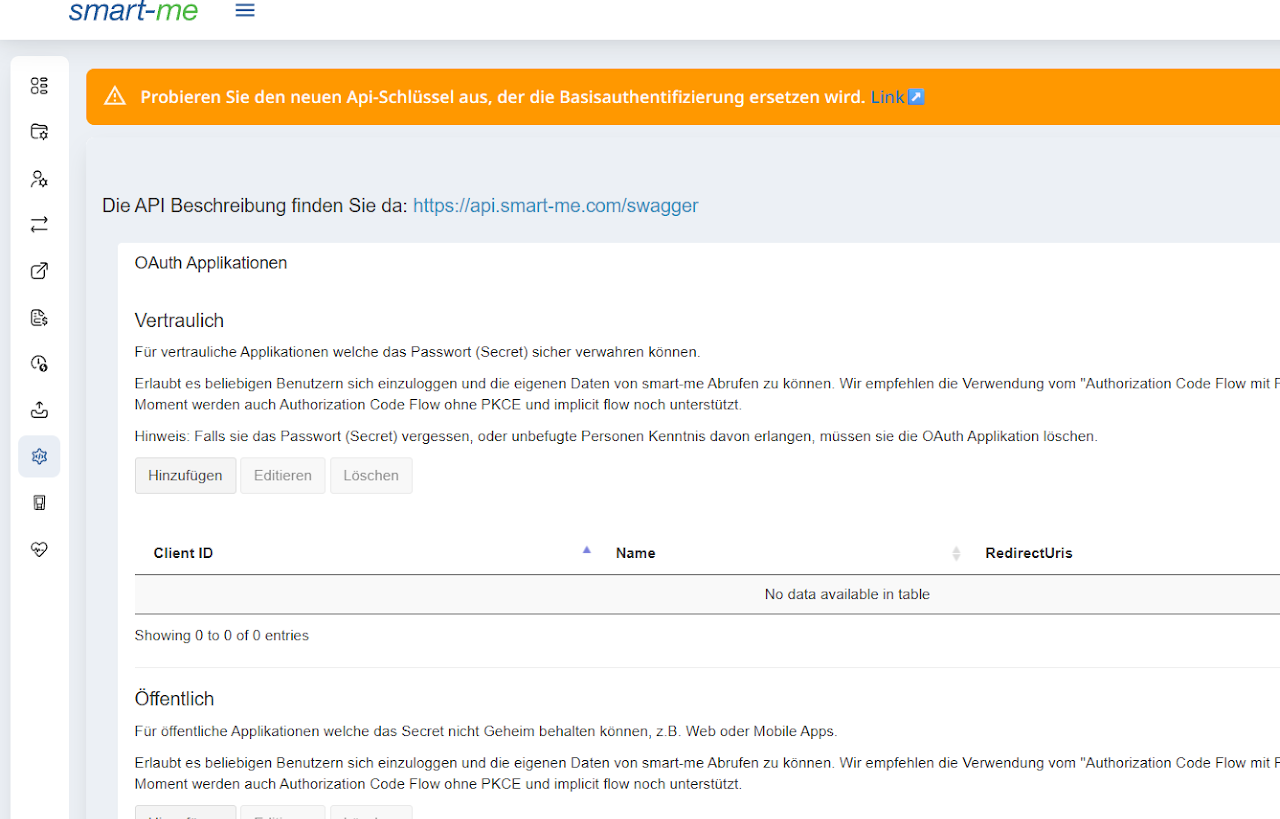
Aggiungere applicazioni oAuth
-
Riservata (limitata a 3 Client ID)
-
Vengono generati Client ID e Client secret
-
Per applicazioni riservate, in grado di custodire la password (secret) in modo sicuro.
-
Consigliamo l'utilizzo di "Authorization Code Flow con PKCE" e "Device Code Flow".
-
-
Pubblica (limitata a 3 Client ID)
-
Viene generato il Client ID
-
Per applicazioni pubbliche che non sono in grado di mantenere segreto il secret, ad es. app web o mobili.
-
Consigliamo l'utilizzo di "Authorization Code Flow con PKCE" e "Device Code Flow"
-
-
Dispositivo (limitato a 50 Client ID)
-
Vengono generati Client ID e Client secret
-
Può essere utilizzato in sostituzione della Basic Authentication in dispositivi embedded privi di interfaccia grafica.
-
Supporta solo il flusso OAuth "client credentials".
-
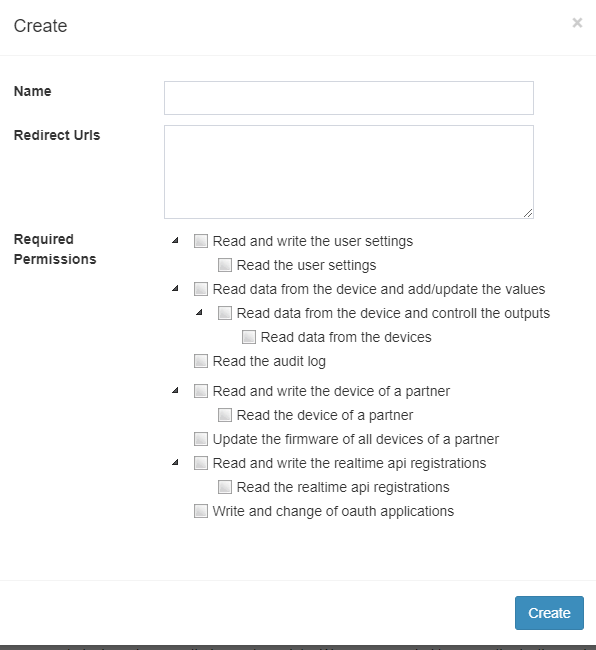
Informazioni necessarie:
-
-
Nome
-
Redirect Urls
-
Autorizzazioni necessarie
-
Grants & Endpoints
L'implementazione di OAuth non è descritta nel nostro wiki. Su questa pagina trovi le informazioni necessarie per implementare oAuth: https://oauth.net/2/
Grants (flussi) supportati per le applicazioni oAuth riservate e pubbliche:
- Authorization Code senza PKCE (obsoleto)
- Authorization Code con PKCE
- Implicit Flow (obsoleto)
- Device Code
- Refresh Token
Grants (flussi) supportati per le applicazioni oAuth di tipo dispositivo (Client Credentials):
- Client Credentials
Endpoint smart-me
- Authorization: /api/oauth/authorize/
- Token: /api/oauth/token/
- Device Code: /api/oauth/device
API in tempo reale (Webhook)
L'API in tempo reale di smart-me (Webhook) ti consente di abbonarti ai nuovi dati di un dispositivo. Puoi registrarti per un singolo dispositivo o per tutti i dispositivi di un utente. Quando un dispositivo invia nuovi dati al cloud, un webhook invia questi dati come richiesta POST a un URL appositamente configurato. Ulteriori informazioni sono disponibili qui.
File proto
syntax = "proto3";
import "google/protobuf/timestamp.proto";
import "bcl.proto";

message DeviceDataArray {
  repeated DeviceData DeviceDataItems = 1;
}

message DeviceData {
  Guid DeviceId = 1;
  .bcl.DateTime DateTime = 2;
  repeated DeviceValue DeviceValues = 3;
}

message DeviceValue {
  bytes Obis = 1;
  double Value = 2;
}
File proto senza BCL
syntax = "proto2";
package com.company;

message TimeSpan {
  required sint64 value = 1; // the size of the timespan (in units of the selected scale)
  optional TimeSpanScale scale = 2; // the scale of the timespan [default = DAYS]
  enum TimeSpanScale {
    DAYS = 0;
    HOURS = 1;
    MINUTES = 2;
    SECONDS = 3;
    MILLISECONDS = 4;
  TICKS = 5;

    MINMAX = 15; // dubious
  }
}

message DateTime {
  optional sint64 value = 1; // the offset (in units of the selected scale) from 1970/01/01
  optional TimeSpanScale scale = 2; // the scale of the timespan [default = DAYS]
  optional DateTimeKind kind = 3; // the kind of date/time being represented [default = UNSPECIFIED]
  enum TimeSpanScale {
    DAYS = 0;
    HOURS = 1;
    MINUTES = 2;
    SECONDS = 3;
    MILLISECONDS = 4;
 TICKS = 5;

    MINMAX = 15; // dubious
  }
  enum DateTimeKind
  {
     // The time represented is not specified as either local time or Coordinated Universal Time (UTC).
     UNSPECIFIED = 0;
     // The time represented is UTC.
     UTC = 1;
     // The time represented is local time.
     LOCAL = 2;
   }
}

message Guid {
  required fixed64 lo = 1; // the first 8 bytes of the guid (note:crazy-endian)
  required fixed64 hi = 2; // the second 8 bytes of the guid (note:crazy-endian)
}

message DeviceData {
   required Guid DeviceId = 1;
   required DateTime DateTime = 2;
   repeated DeviceValue DeviceValues = 3;
}
message DeviceDataArray {
   repeated DeviceData DeviceDataItems = 1;
}
message DeviceValue {
   required bytes Obis = 1;
   required double Value = 2;
}
Goldpartner - API
Per poter utilizzare la nostra API Goldpartner, devi disporre del modello di licenza smart-me Goldpartner. Ulteriori informazioni su questo modello di licenza possono essere richieste al reparto vendite.
Endpoints
Get all devices
-
Restituisce tutti i dispositivi assegnati al partner
-
GET /PartnerAllDevices
Get all devices from one Account
-
Restituisce tutti i dispositivi assegnati a uno degli utenti assegnati al partner (ottenere l'Id con "Get users")
-
GET /PartnerAllDevices/{id} - solo per un dispositivo
Get all device informations
-
Restituisce tutte le informazioni di tutti i dispositivi assegnati all'utente partner o a un sottoutente del partner
-
GET /PartnerAllDeviceInformations
-
GET /PartnerAllDeviceInformations/{id} - solo per un dispositivo
Get fast send device values
-
Forza un dispositivo a inviare i dati ogni secondo (se supportato). Questo per circa 30s
-
GET /partner/fastsenddevicevalues
Get Folder menu
-
Restituisce le voci del menu delle cartelle per un utente di un partner
-
GET /partner/foldermenu/{id}
Update folder menu
-
Crea e aggiorna le voci del menu delle cartelle per un utente. Attenzione: tutta la configurazione esistente (cartelle, conteggio, esportazione, ...) viene eliminata!!
-
POST /partner/foldermenu/{id}
Get users
-
Restituisce le informazioni su tutti gli utenti del partner
-
GET /partner/user
Update user
-
Aggiorna l'e-mail e/o la password di un utente. L'utente deve essere stato creato dal partner.
-
POST /partner/user/{id}
Sign up user
-
Crea un nuovo utente e lo assegna all'utente partner
-
POST /SignUpPartner
Get values in past multiple
-
Restituisce più valori di un dispositivo. Il dispositivo deve essere installato in un account assegnato al tuo account partner.
-
GET /partner/ValuesInPastMultiple/{id}
Get values in past multiple interpolated
-
Restituisce più valori interpolati di un dispositivo
-
GET /partner/ValuesInPastMultipleInterpolated/{id}
Get visualization configuration
-
Restituisce la configurazione della visualizzazione per tutte le cartelle di un utente
-
GET /partner/visualizationconfiguration/{id}
Update firmware
-
Aggiorna il firmware (se disponibile) per i dispositivi indicati
-
POST /UpdateFirmwarePartner
PartnerVisualization
-
Restituisce la configurazione della visualizzazione per tutte le cartelle di un utente
-
GET /partner/visualizationconfiguration/{id}
Esempi
Esempi API
Esempi REST API
Con questi puoi recuperare qualsiasi set di dati che mettiamo a disposizione. https://api.smart-me.com/swagger/index.html
Python (comandare ingressi e uscite)
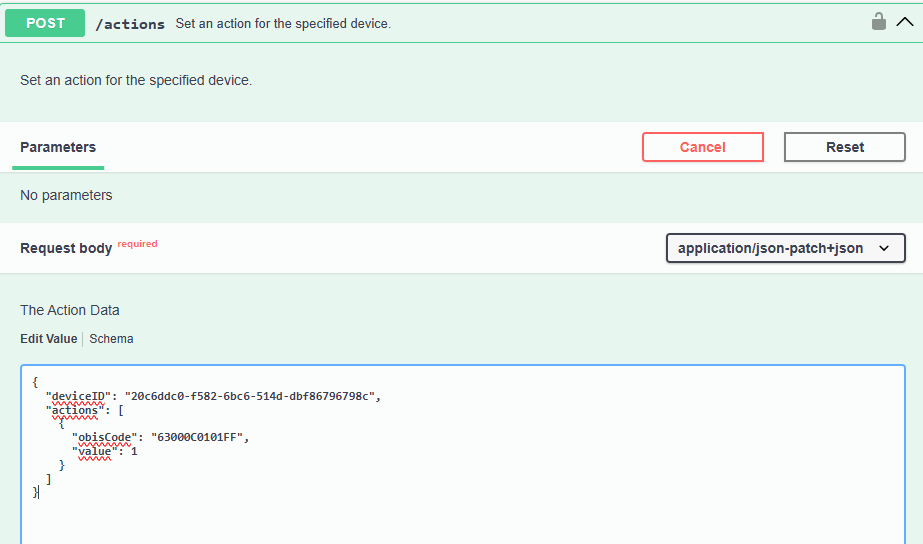
# deviceID ist die eindeutige ID des Gerät
# "ObisCode": "63000C0101FF" ist der Output 0 (Halbleiter 0.4 Watt)
# "ObisCode": "63000C0102FF" ist der Output 1 (Relais 1500 Watt bei 230 Volt)
# "value": 0 ist aus
# "value": 1 ist ein

import requests
import json

# API Endpoint und Zugangsdaten
url = "https://xxxx:xxxx@api.smart-me.com/actions"

# JSON-Daten, die gesendet werden sollen
data = {
  "deviceID": "20c6ddc0-f582-6bc6-514d-dbf86796798c",
  "actions": [
    {
      "obisCode": "63000C0101FF",
      "value": 1
    }
  ]
}

# Header für die POST-Anfrage
headers = {
    'Content-Type': 'application/json'
}

try:
    # POST-Anfrage senden
    response = requests.post(url, headers=headers, data=json.dumps(data))

    # Überprüfen, ob die Anfrage erfolgreich war
    response.raise_for_status()

    # Die Antwort der API ausgeben
    print("Status Code:", response.status_code)
    print("Antwort vom Server:", response.text)

except requests.exceptions.RequestException as e:
    # Fehlerbehandlung
    print("Ein Fehler ist aufgetreten:", e)
HTML / Javascript (visualizzare tutti i dispositivi con lettura del contatore e ultima connessione)
<html>
	<style>
	table, th, td {
	  border:1px solid black;
	}
	</style>
	<head>
		<title>smart-me REST API Sample</title>
		<script src="https://code.jquery.com/jquery-3.6.4.min.js"></script>
	</head>
	<body>
		<div>
		  <label for="username">Username:</label>
		  <input type="text" id="username" name="username" />
		</div>
		<div>
		  <label for="pass">Password:</label>
		  <input type="password" id="pass" name="password" minlength="8" required />
		</div>
		<button id="myButton">Start Request</button>
		<h1>Get all devices</h1>
		<ul id="DeviceList">
		</ul>
		<script type="text/javascript">
			function GetAllDevices() {
			var smartmeUserName = document.getElementById("username").value;
			var smartmePassword = document.getElementById("pass").value;
			//var smartmeUserName = "xxx";
			//var smartmePassword = "xxx";
				var targetUrl = "https://api.smart-me.com/Devices/";

				$.ajax({
					url: targetUrl,
					type: "get",
					cache: false,
					headers: {
						"Authorization": "Basic " + btoa(smartmeUserName + ":" + smartmePassword)
					},
					dataType: "json",
					error: function(jqXHR, exception) {
						alert(exception);
					},
					success: function(json) {
					$("#DeviceList").append(("<table>"))
					$("#DeviceList").append(("<tr align=left><th>Serial</th><th>Name</th><th>CounterReading</th><th>CounterReadingUnit</th><th>Last Connection (Zulu Time) </th></tr>"))
						json.forEach(function(element) {
							$("#DeviceList").append(("<tr><td>") + element.Serial + "</td><td>" + element.Name + "</td><td>" + element.CounterReading + "</td><td>" + element.CounterReadingUnit + "</td><td>" + element.ValueDate + "</td></tr>");
						});
					$("#DeviceList").append(("</table>"))
					}
				});
			}
			myButton.onclick = GetAllDevices;
		</script>
	</body>
	<footer>
		<p>DISCLAIMER: This script is provided as-is, without any warranty or guarantee of any kind. The author accepts no liability for any issues, damages, or consequences that may arise from the use of this script. Users are responsible for reviewing and understanding the script before implementation. Additionally, no support or assistance will be provided for the installation, customization, or troubleshooting of this script. Use at your own risk.</p>
		<p>HAFTUNGSAUSSCHLUSS: Dieses Skript wird im Ist-Zustand ohne jegliche Garantie oder Gewährleistung bereitgestellt. Der Autor übernimmt keine Haftung für Probleme, Schäden oder Folgen, die sich aus der Verwendung dieses Skripts ergeben können. Die Benutzer sind dafür verantwortlich, das Skript vor der Implementierung zu überprüfen und zu verstehen. Außerdem wird keine Unterstützung oder Hilfe bei der Installation, Anpassung oder Fehlerbehebung dieses Skripts geleistet. Die Verwendung erfolgt auf eigene Gefahr..</p>
	</footer>
</html>
Python (esempi di autorizzazione)
import requests
from requests.auth import HTTPBasicAuth

# --- Endpoint ---
endpoint_url = 'https://api.smart-me.com/Devices'

# --- Basic Auth ---
basicAuth_user = 'max.musterman@smart-me.com'
basicAuth_pass = 'supersecretpassword'
basicAuth_response = requests.get(
    endpoint_url,
    auth=HTTPBasicAuth(basicAuth_user, basicAuth_pass)
)
print('Basic Auth:', basicAuth_response.status_code) #Returns 200 if successful

# --- API Key ---
api_key = 'secretapikey1234567890'
apikey_headers = {'Authorization': f'ApiKey {api_key}'}
apikey_response = requests.get(endpoint_url, headers=apikey_headers)
print('API Key:', apikey_response.status_code) #Returns 200 if successful

# --- OAuth 2.0: Get Token with Client ID and Secret ---
token_url = 'https://api.smart-me.com/oauth/token'
client_id = 'client_id_1234567890'
client_secret = 'client_secret_1234567890'
token_data = {
    'grant_type': 'client_credentials',
    'scope': 'device.read'
}
token_response = requests.post(
    token_url,
    data=token_data,
    auth=HTTPBasicAuth(client_id, client_secret)
)

access_token = token_response.json().get('access_token')

# --- OAuth 2.0 Bearer Token ---
oauth_headers = {'Authorization': f'Bearer {access_token}'}
oauth_response = requests.get(endpoint_url, headers=oauth_headers)
print('OAuth:', oauth_response.status_code) #Returns 200 if successful
Libreria client API per .Net
Per integrare le funzionalità dell'API smart-me nella tua applicazione .Net, puoi utilizzare questa libreria. Esegue richieste HTTP verso la REST API di smart-me. Tutti i corpi delle richieste e delle risposte HTTP vengono mappati su classi .Net.
Esempi di API in tempo reale (Webhook)
La Realtime API di smart-me invia i dati serializzati con Google Protocol Buffers
File proto
package RealtimeApi.Containers;
import "bcl.proto"; // schema for protobuf-net's handling of core .NET types

message DeviceData {
   required bcl.Guid DeviceId = 1;
   required bcl.DateTime DateTime = 2;
   repeated DeviceValue DeviceValues = 3;
}
message DeviceDataArray {
   repeated DeviceData DeviceDataItems = 1;
}
message DeviceValue {
   required bytes Obis = 1;
   required double Value = 2;
}
File proto senza BCL
syntax = "proto2";
package com.company;

message TimeSpan {
  required sint64 value = 1; // the size of the timespan (in units of the selected scale)
  optional TimeSpanScale scale = 2; // the scale of the timespan [default = DAYS]
  enum TimeSpanScale {
    DAYS = 0;
    HOURS = 1;
    MINUTES = 2;
    SECONDS = 3;
    MILLISECONDS = 4;
  TICKS = 5;

    MINMAX = 15; // dubious
  }
}

message DateTime {
  optional sint64 value = 1; // the offset (in units of the selected scale) from 1970/01/01
  optional TimeSpanScale scale = 2; // the scale of the timespan [default = DAYS]
  optional DateTimeKind kind = 3; // the kind of date/time being represented [default = UNSPECIFIED]
  enum TimeSpanScale {
    DAYS = 0;
    HOURS = 1;
    MINUTES = 2;
    SECONDS = 3;
    MILLISECONDS = 4;
 TICKS = 5;

    MINMAX = 15; // dubious
  }
  enum DateTimeKind
  {
     // The time represented is not specified as either local time or Coordinated Universal Time (UTC).
     UNSPECIFIED = 0;
     // The time represented is UTC.
     UTC = 1;
     // The time represented is local time.
     LOCAL = 2;
   }
}

message Guid {
  required fixed64 lo = 1; // the first 8 bytes of the guid (note:crazy-endian)
  required fixed64 hi = 2; // the second 8 bytes of the guid (note:crazy-endian)
}

message DeviceData {
   required Guid DeviceId = 1;
   required DateTime DateTime = 2;
   repeated DeviceValue DeviceValues = 3;
}
message DeviceDataArray {
   repeated DeviceData DeviceDataItems = 1;
}
message DeviceValue {
   required bytes Obis = 1;
   required double Value = 2;
}
Esempio di parsing
Dati di esempio
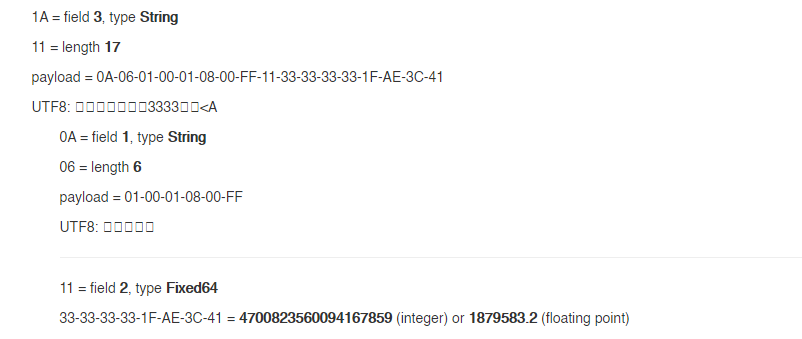
0A5A0A1209E9FCD03B8E9F834111B3D10C1622A22CA1120B08C0C9EAD3A98FE93710051A110A060100010800FF11333333331FAE3C411A110A060100020800FF1100000000000000001A110A060100010700FF11713D0AD7A3303840

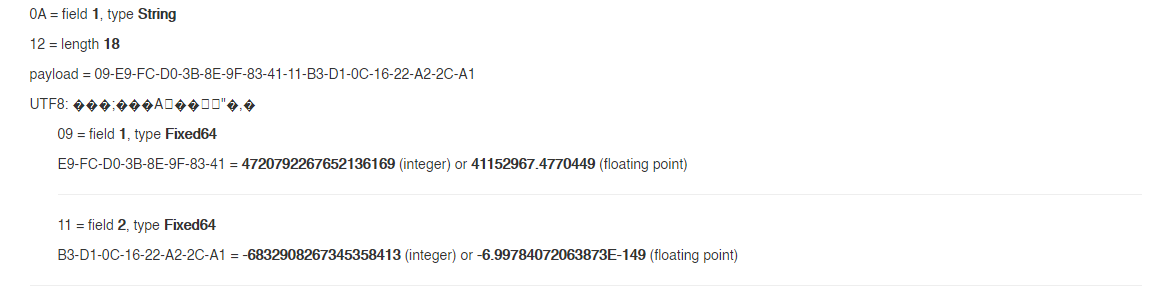
Device ID (UUID / GUID)
Dati UUID: 0xE9, 0xFC, 0xD0, 0x3B, 0x8E, 0x9F, 0x83, 0x41, 0xB3, 0xD1, 0x0C, 0x16, 0x22, 0xA2, 0x2C, 0xA1
GUID: 3bd0fce9-9f8e-4183-b3d1-0c1622a22ca1
Datetime (UTC)
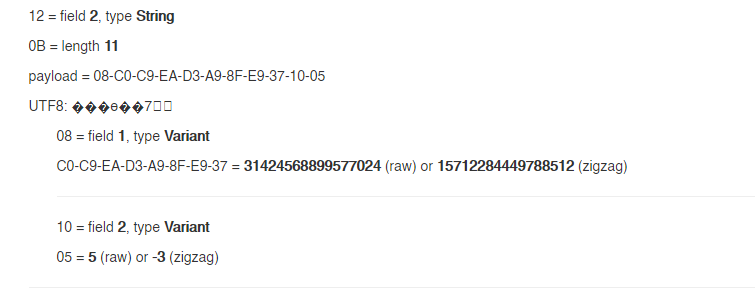
Il campo 1 contiene l'offset in tick dal 01.01.1970
Secondi dal 01.01.1970: 15712284449788512 / 10000000 = 1571228444 (Unix time stamp UTC)
-> 16.10.2019 12:20:44 (UTC)
Device values
Il campo 1 contiene il codice OBIS, il campo 2 contiene il valore.
01-00-01-08-00-FF: (1-0:1.8.0*255): energia attiva prelievo totale: 1879583.2 mWh = 1879.5832 Wh