Commissioning smart-me devices
Preparation
The following must be in place before commissioning
WiFi requirements
-
WiFi 802.11 b/g/n 2.4GHz (no 5GHz or combined network with the same SSID)
-
Port 80 UDP and 53 UDP/TCP must be open to the outside.
-
The network requires an internet connection.
-
The SSID must not be hidden.
-
The SSID only supports ASCII characters, excluding $ (Ä, Ö, Ü do not work)
-
MAC address filters must be disabled during installation. (The MAC addresses of the devices can only be read out via ARP)
-
The network requires a DHCP server
-
SSID max. 28 characters
-
Password max. 63 characters
smart-me account
We recommend creating an account in advance and a separate one for each installation. No licences are required for commissioning.
Installer App
The free Installer App must be installed on your smartphone and the necessary permissions must be granted.
iOS: Location, Local Network, Camera
Android: Location, Camera
Special tools
-
Pico: An RFID card (supplied)
-
Telstar 80A, CT and M-Bus Gateway: A small screwdriver to press the T1 button

Installation
Quick guide
-
Check the WiFi requirements (see above)
-
Grant the app permissions
-
Connect your smartphone or tablet to the WiFi network in which you want to install the smart-me device.
-
Start the app, log in with the corresponding account or create an account.
-
In the menu, use Diagnosis (Diagnose) to check whether the servers are reachable.
-
Click "Install device" („Gerät installieren“) (+) at the bottom right
-
For an installation via WiFi, the network can be added at the top.
-
Click "Add device" („Gerät hinzufügen“) (+) at the bottom right
-
Scan the QR code
-
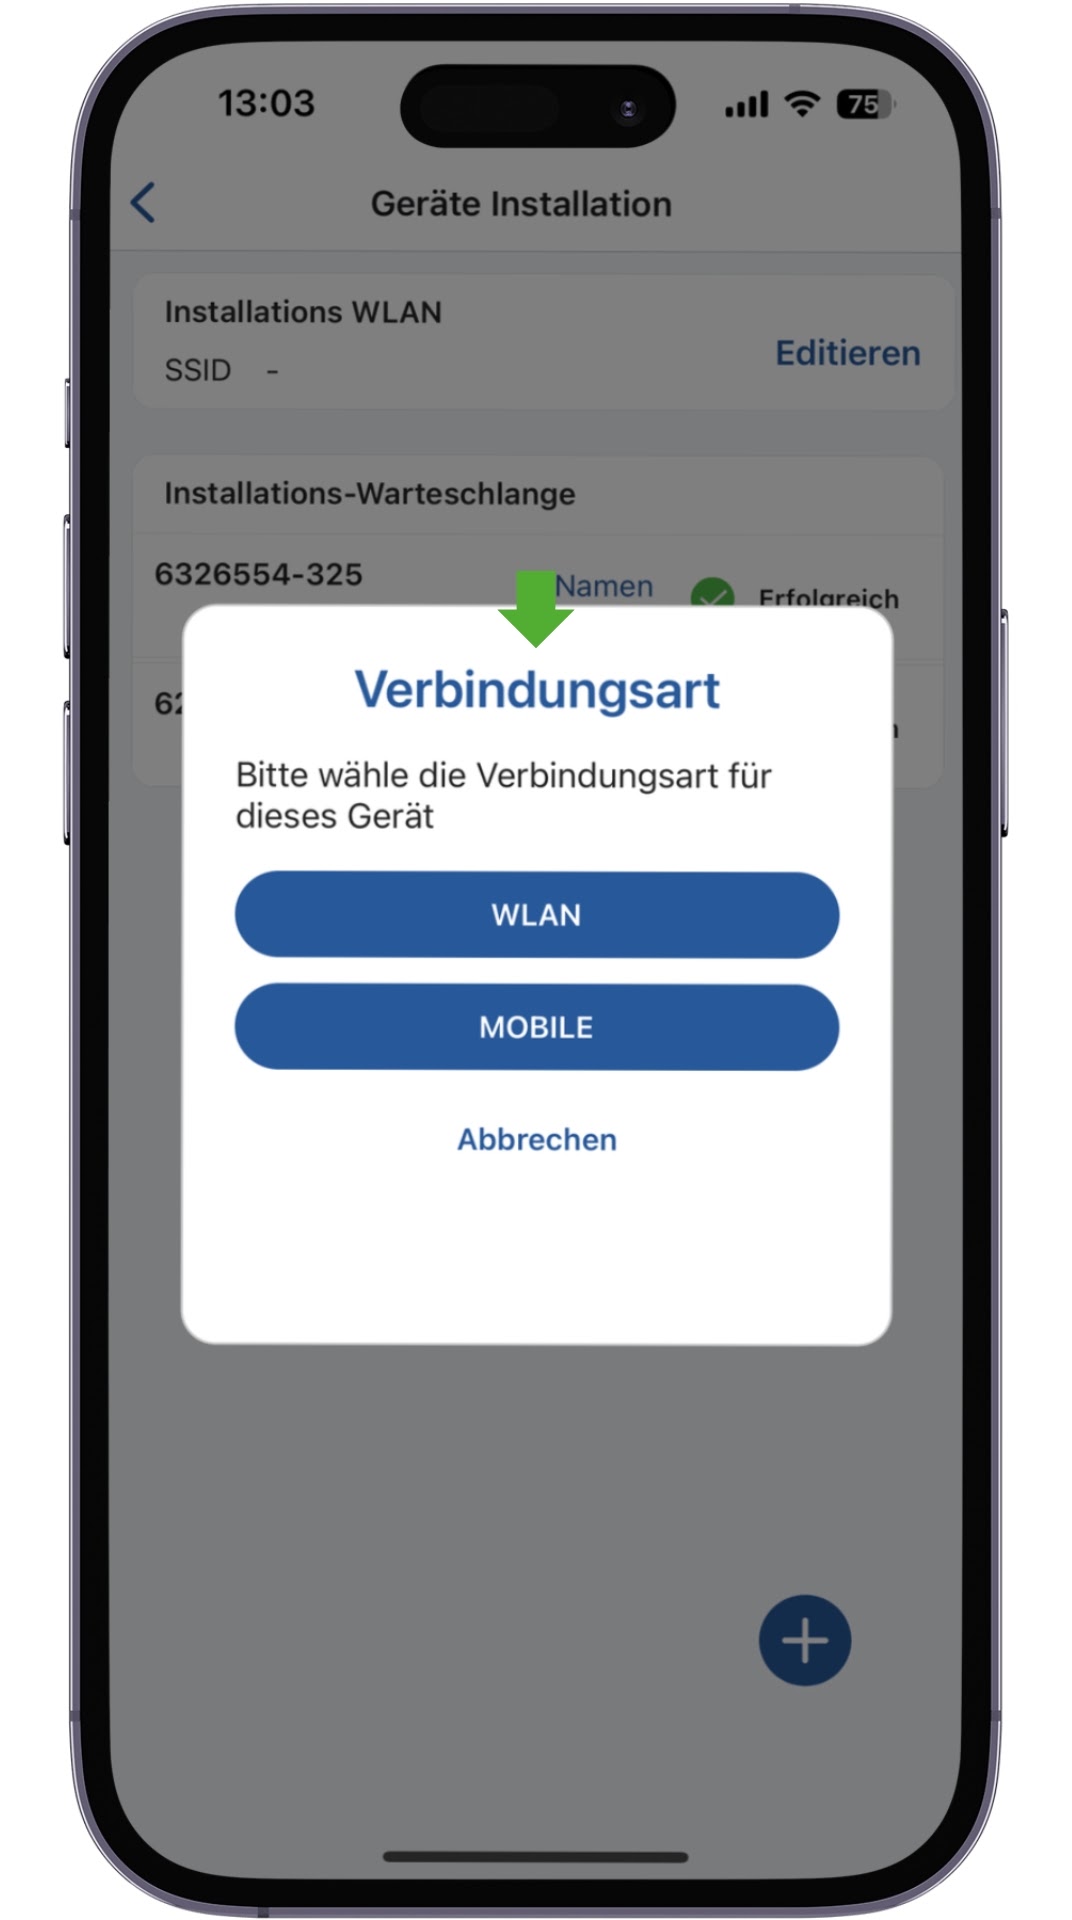
For Pico, select whether you want to use WiFi or Mobile (4G).
-
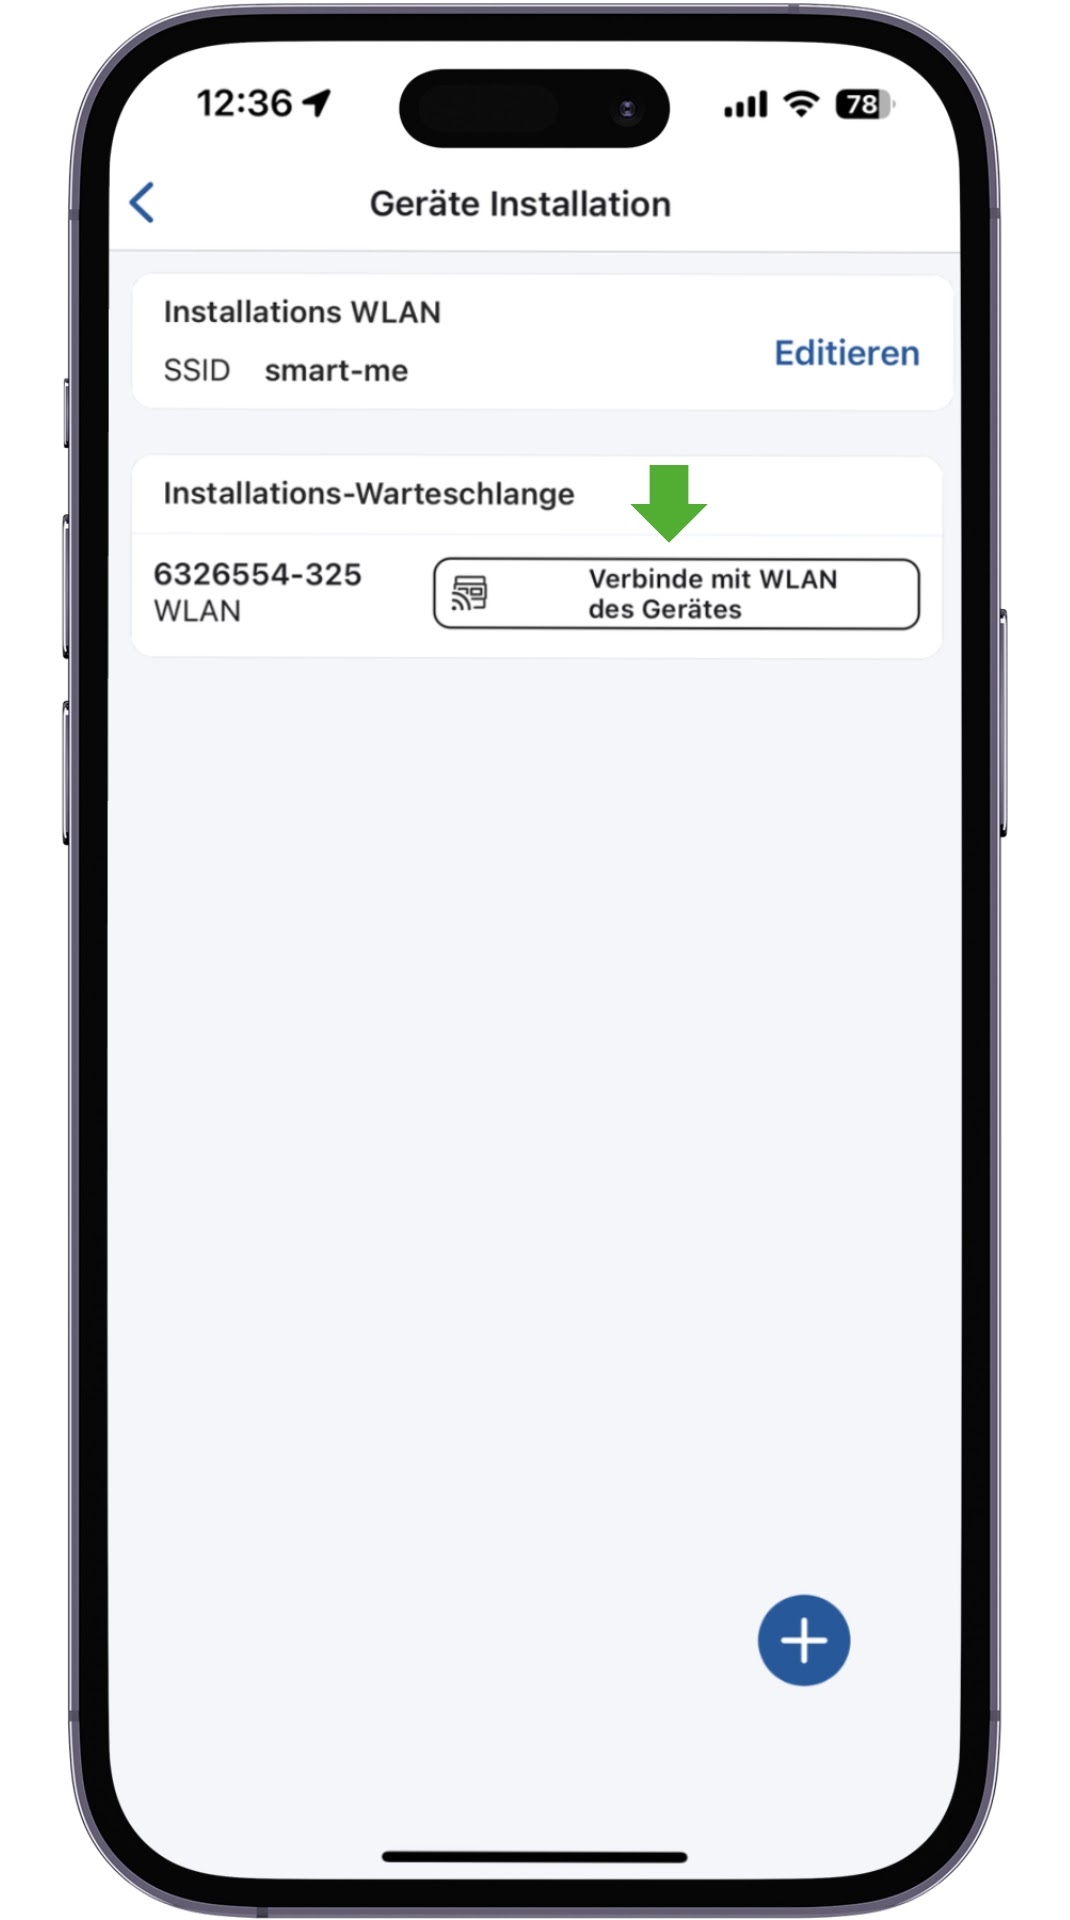
Select "Connect to the device's WiFi" ("Verbinde mit WLAN des Gerätes")
-
Press T1 or hold the RFID card against the device. Note: The Pico must be installed within 15 minutes of switching on the power.
-
Select "WLAN quick connect"
-
Wait until you are prompted to connect to smart-me_xxxxxx.
-
Wait until the installation has been completed successfully.
-
Assign a name.
-
Device-specific settings
-
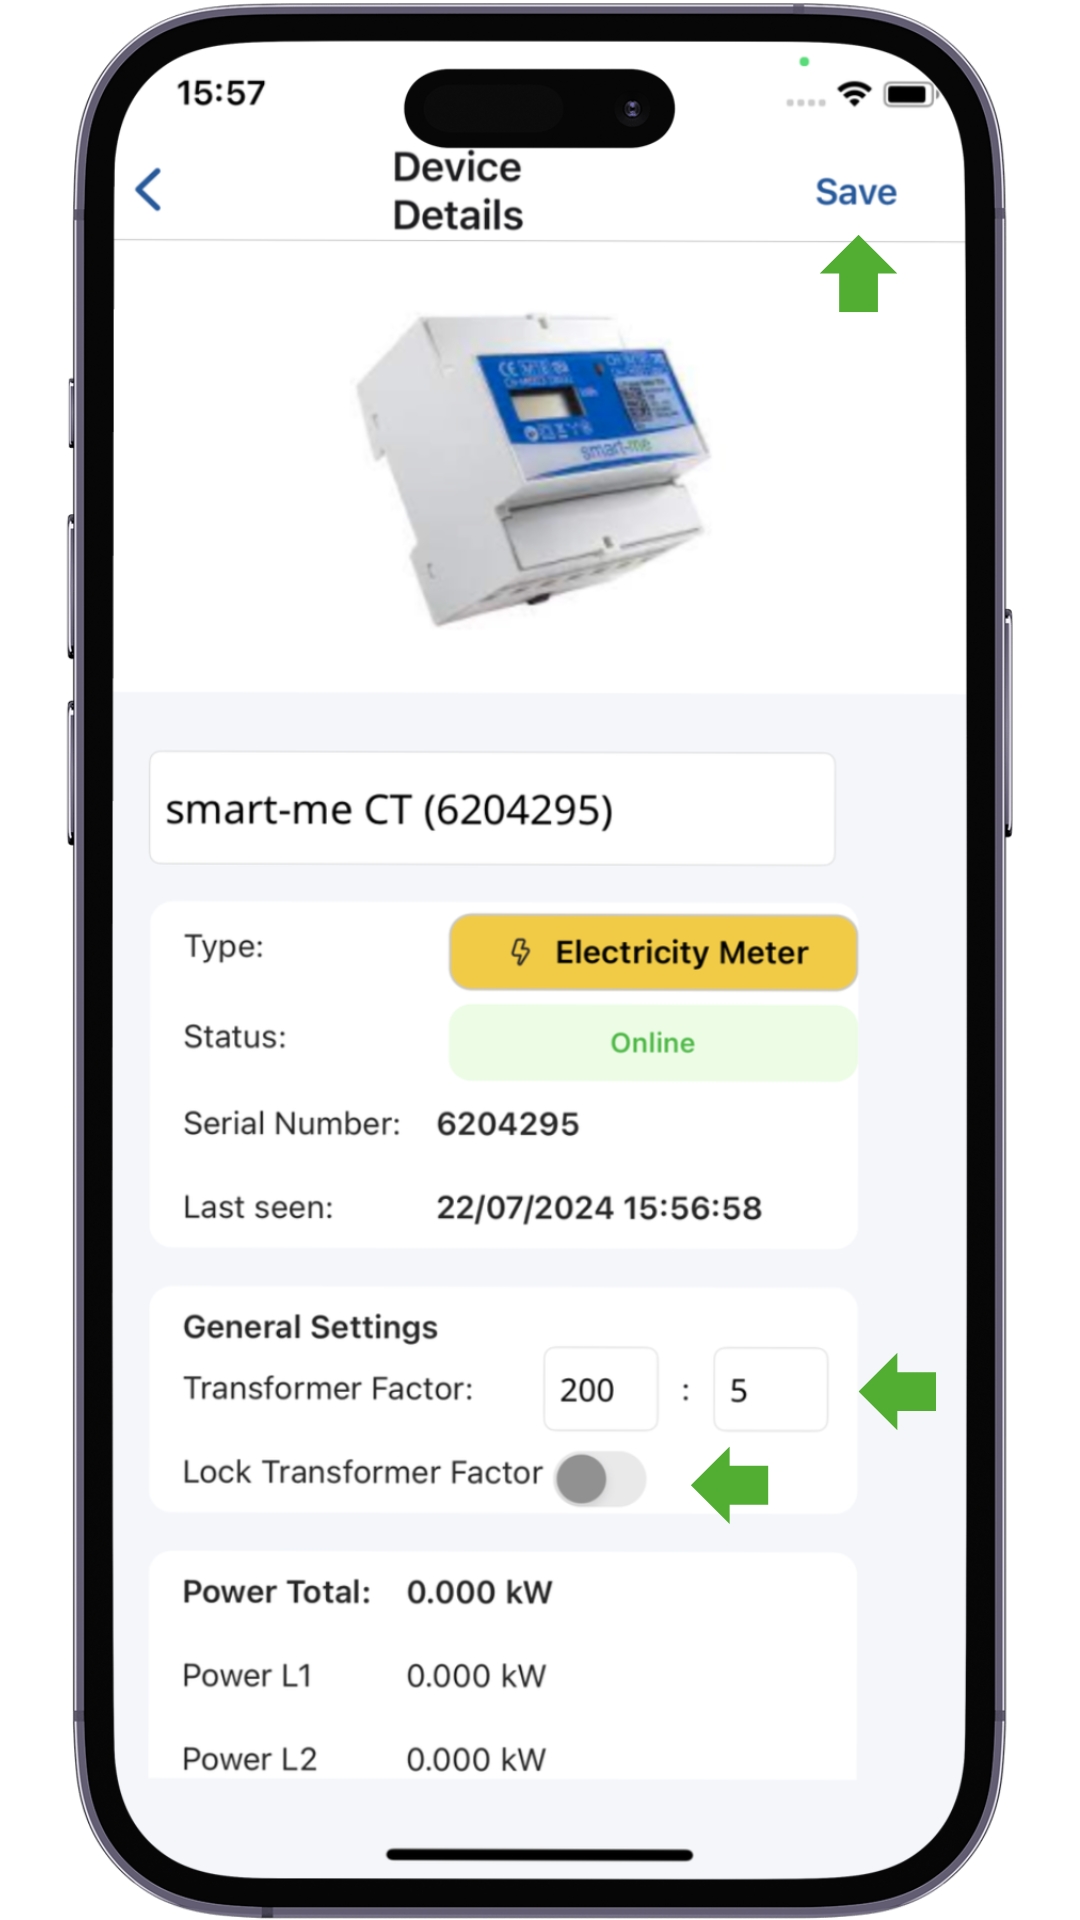
Telstar CT: Set the transformer ratio (select CT / edit / enter transformer ratio)
-
M-Bus: The scan must be started via the web portal (gear icon / start scan)
-
Kamstrup: Meter key (three gear icons / meter key / save)
-
If the installation fails, please follow the detailed guide including error descriptions.
Detailed guide including error descriptions
1. WiFi connection
Connect the smartphone to the same 2.4 GHz WiFi network that the devices will later use.
2. Creation / connection
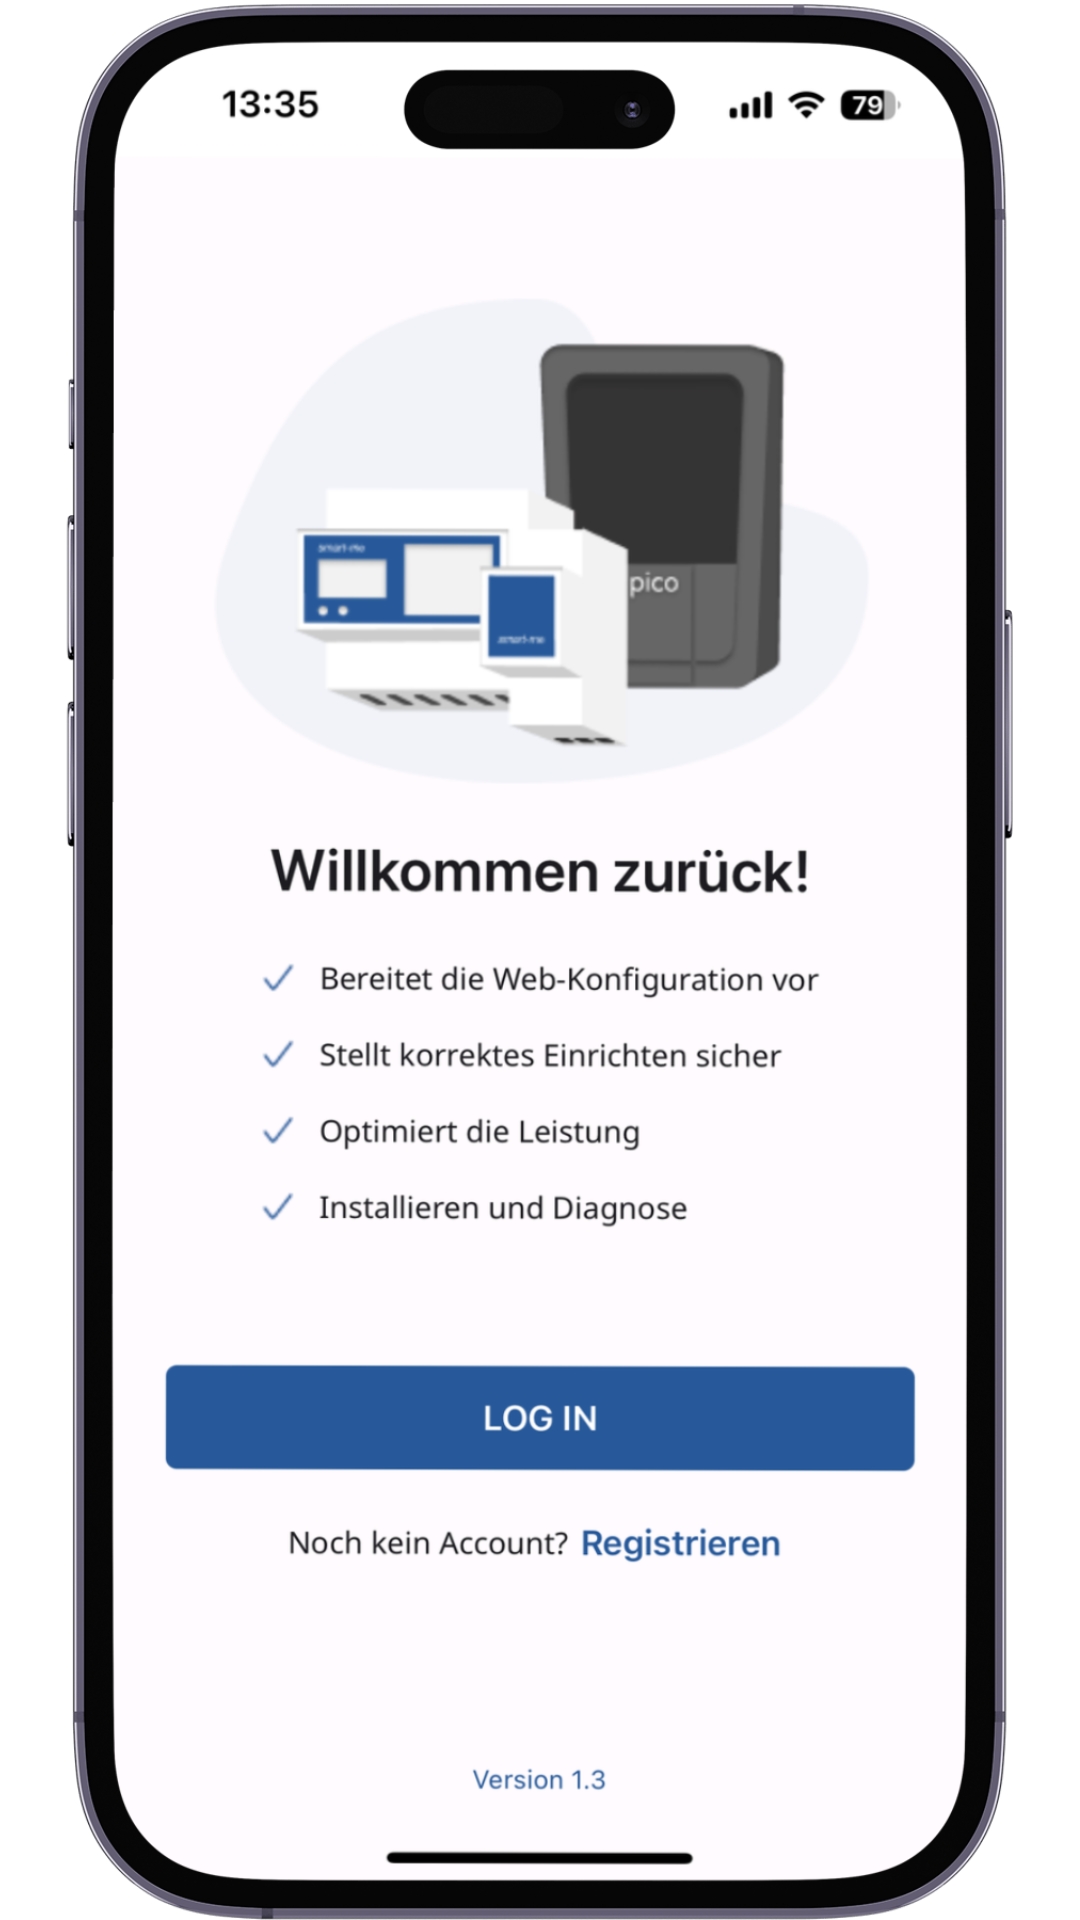
3. Account creation
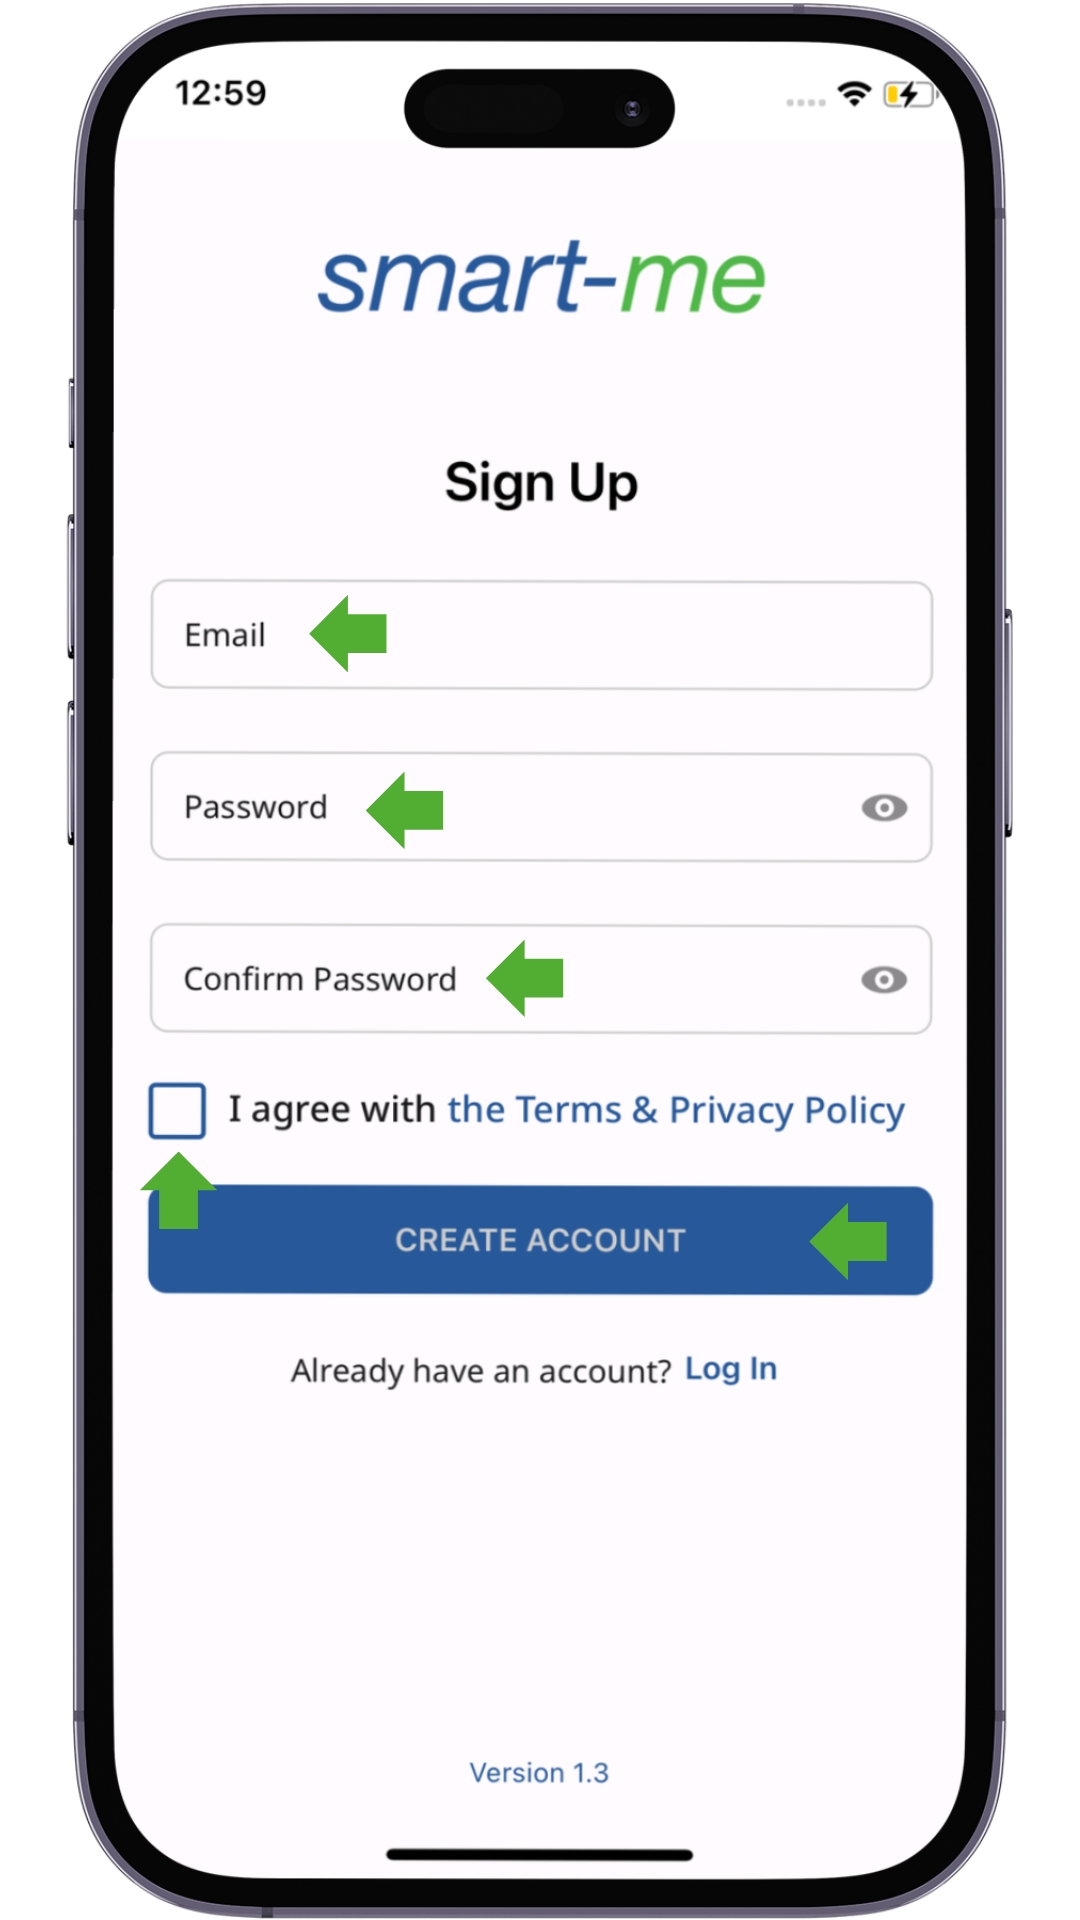
Possible problems: If the e-mail address is already in use, a different one must be used.
4. Account login
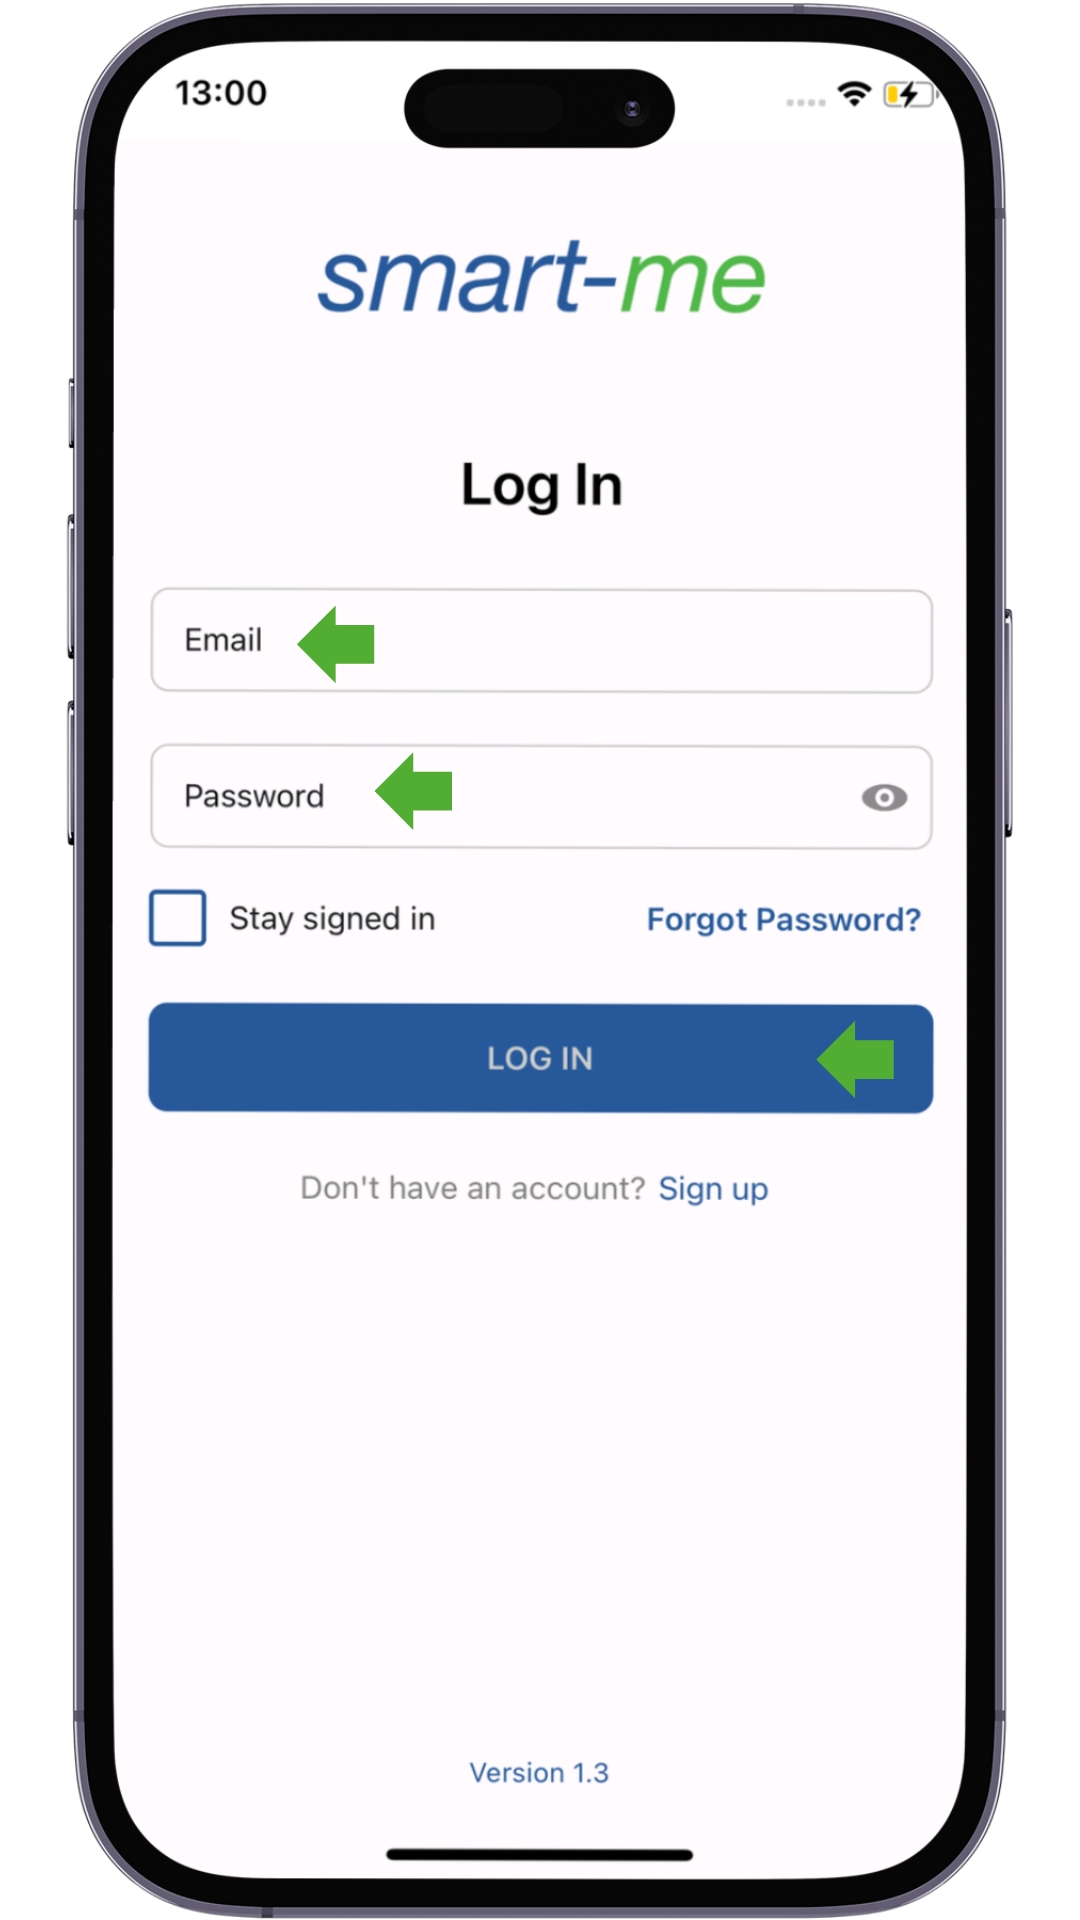
Possible problems: If you cannot log in, check whether the WiFi network has an internet connection and whether the username and password are correct.
5. Diagnosis
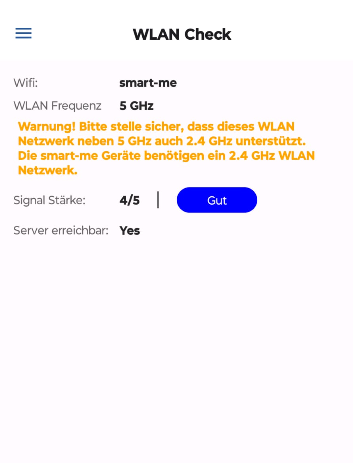
This step is optional. What matters is that "Server reachable" („Server erreichbar") is set to Yes.
If the warning about the 5 GHz network appears, a 2.4 GHz network must also be available. The smartphone cannot be forced to use it — which is why this is only a warning.
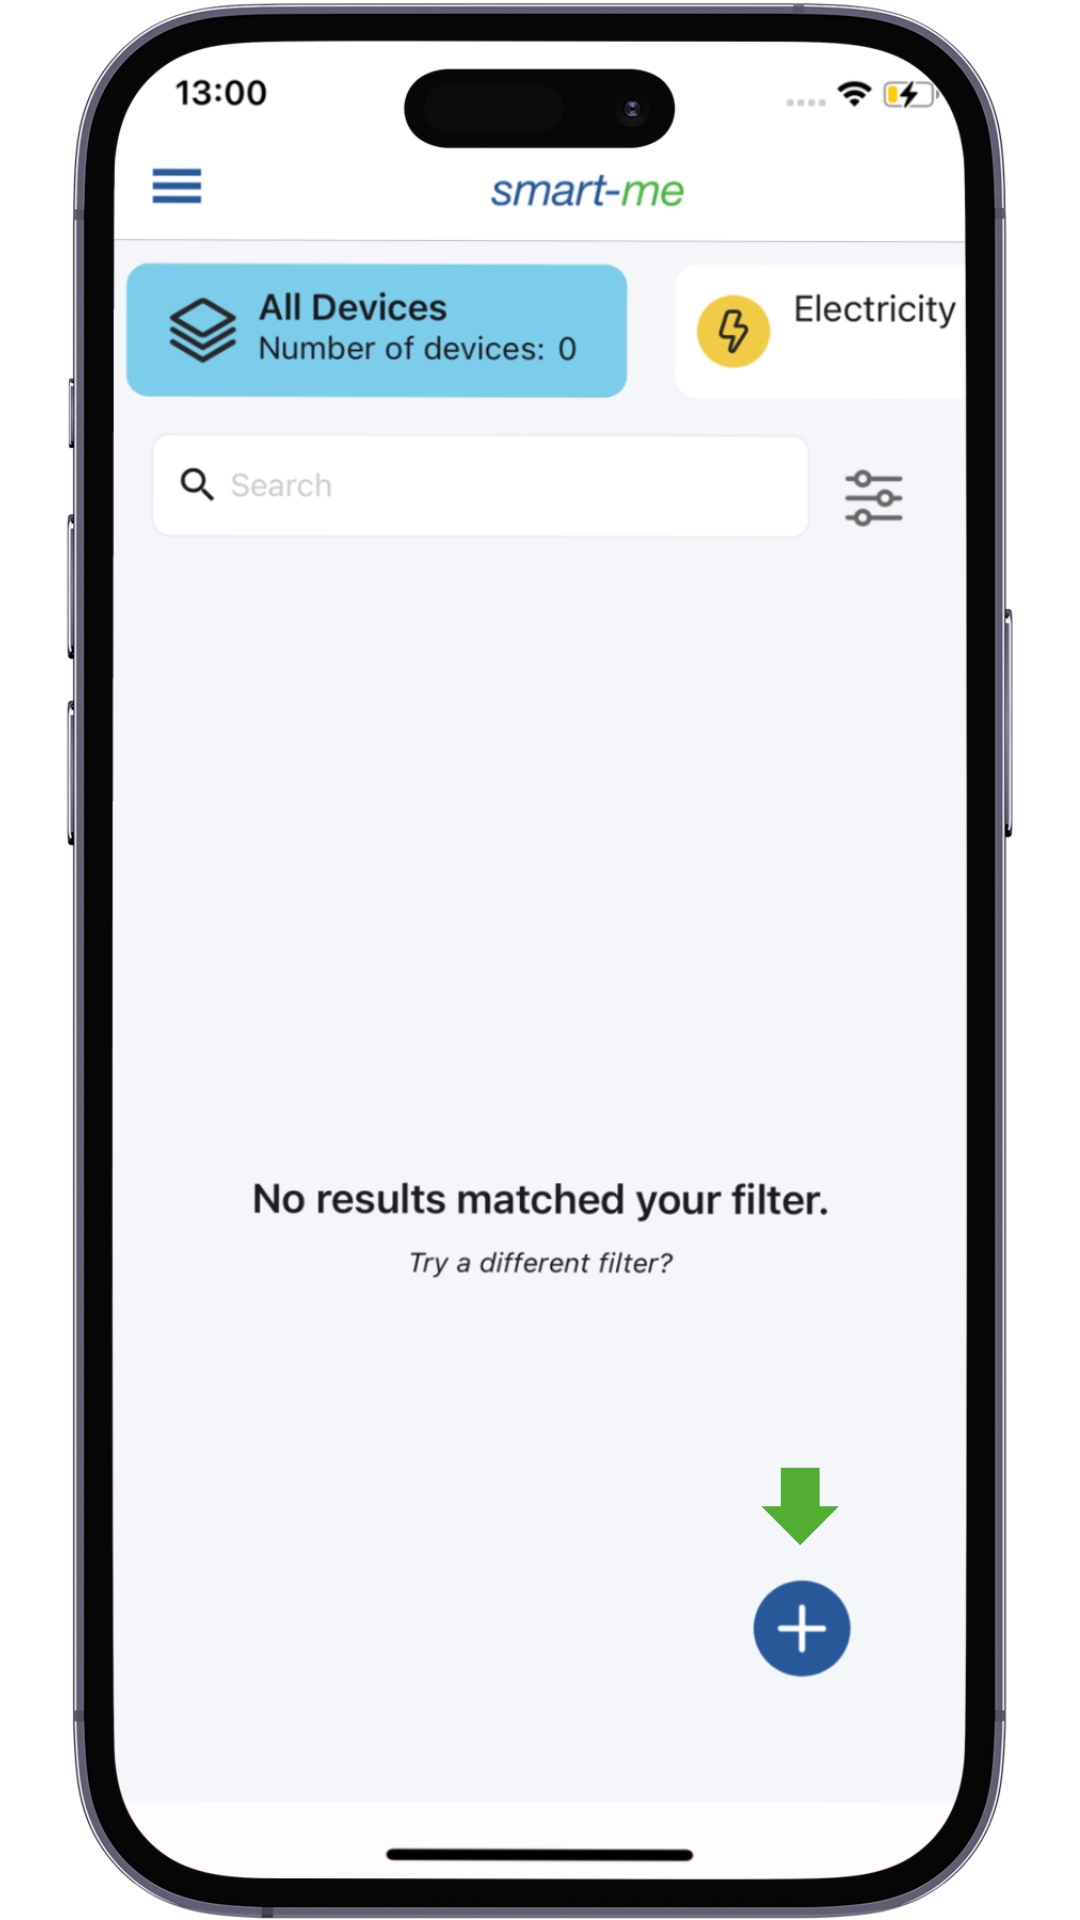
6. Click "Add device" („Gerät hinzufügen") (+)
7. Click "Edit" („Editieren")
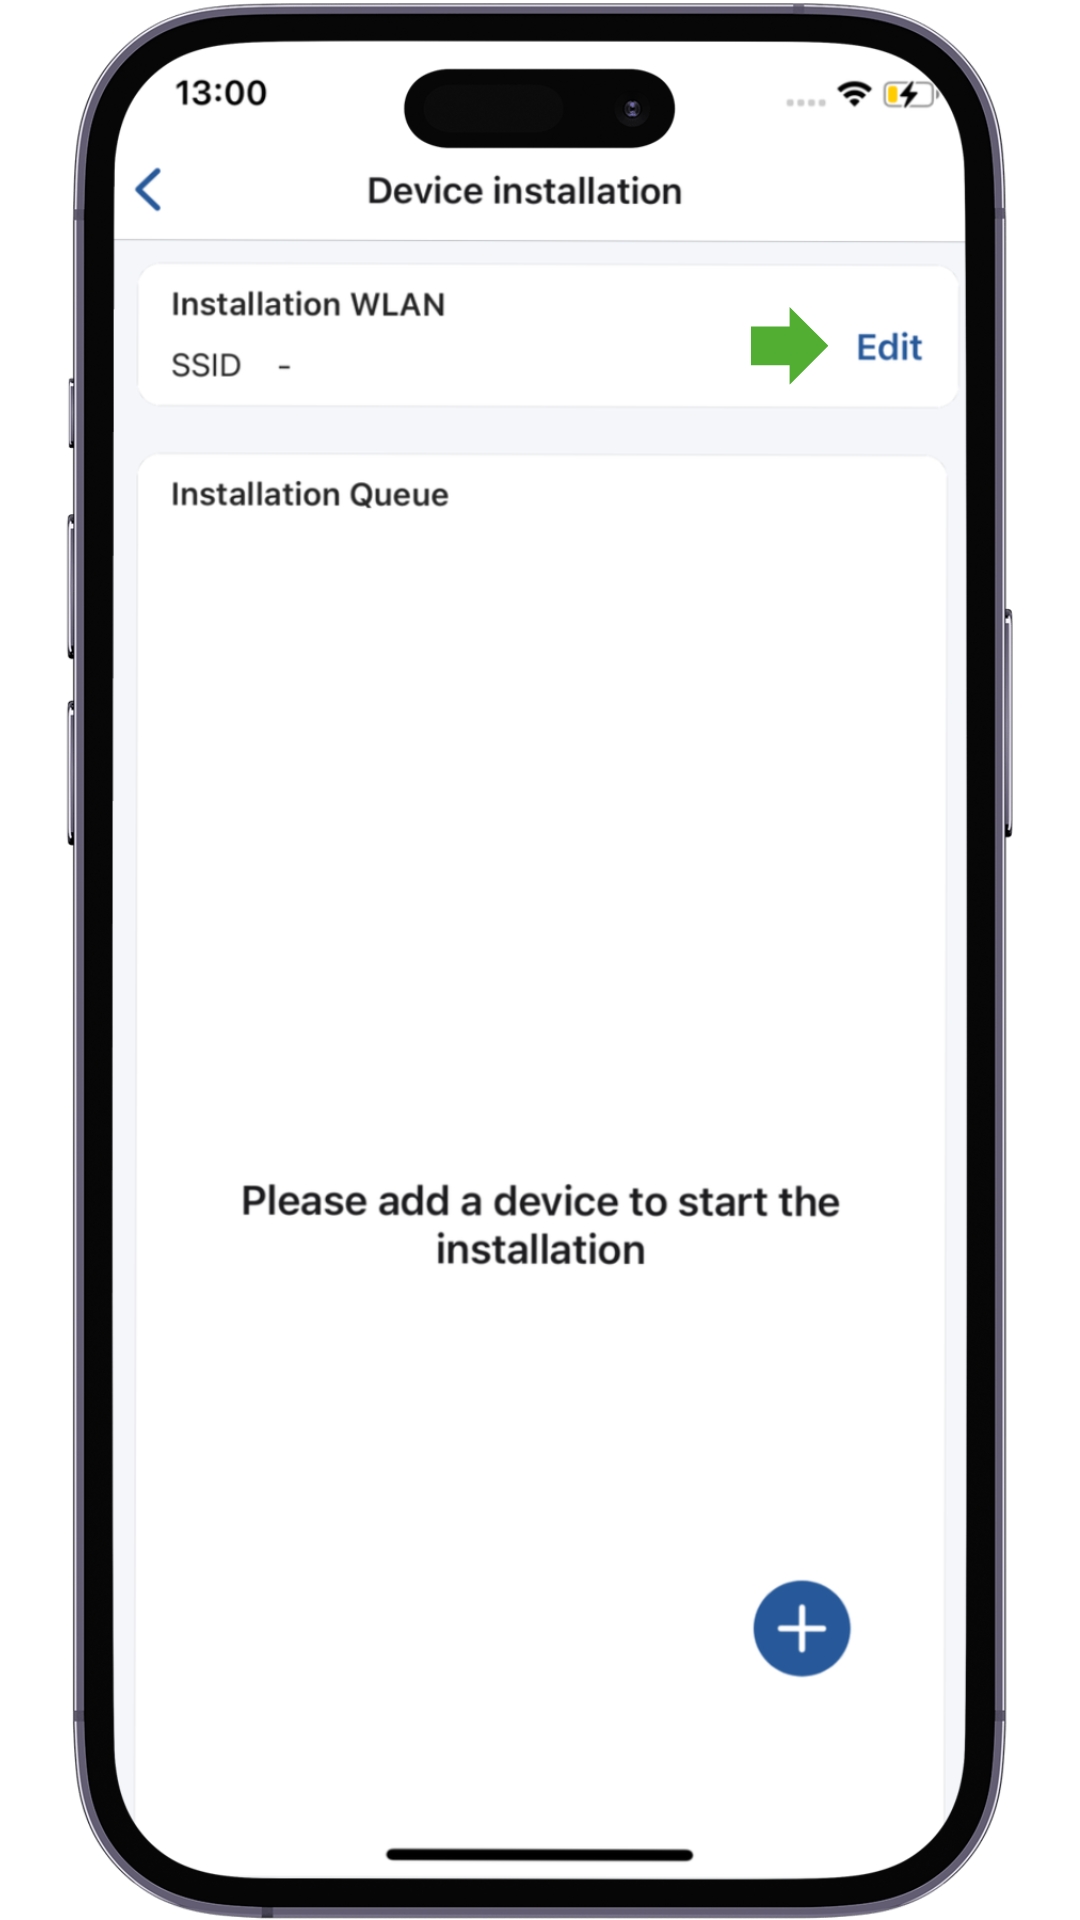
Note: This step is not required if Picos are commissioned via 4G.
8. Enter the WiFi password
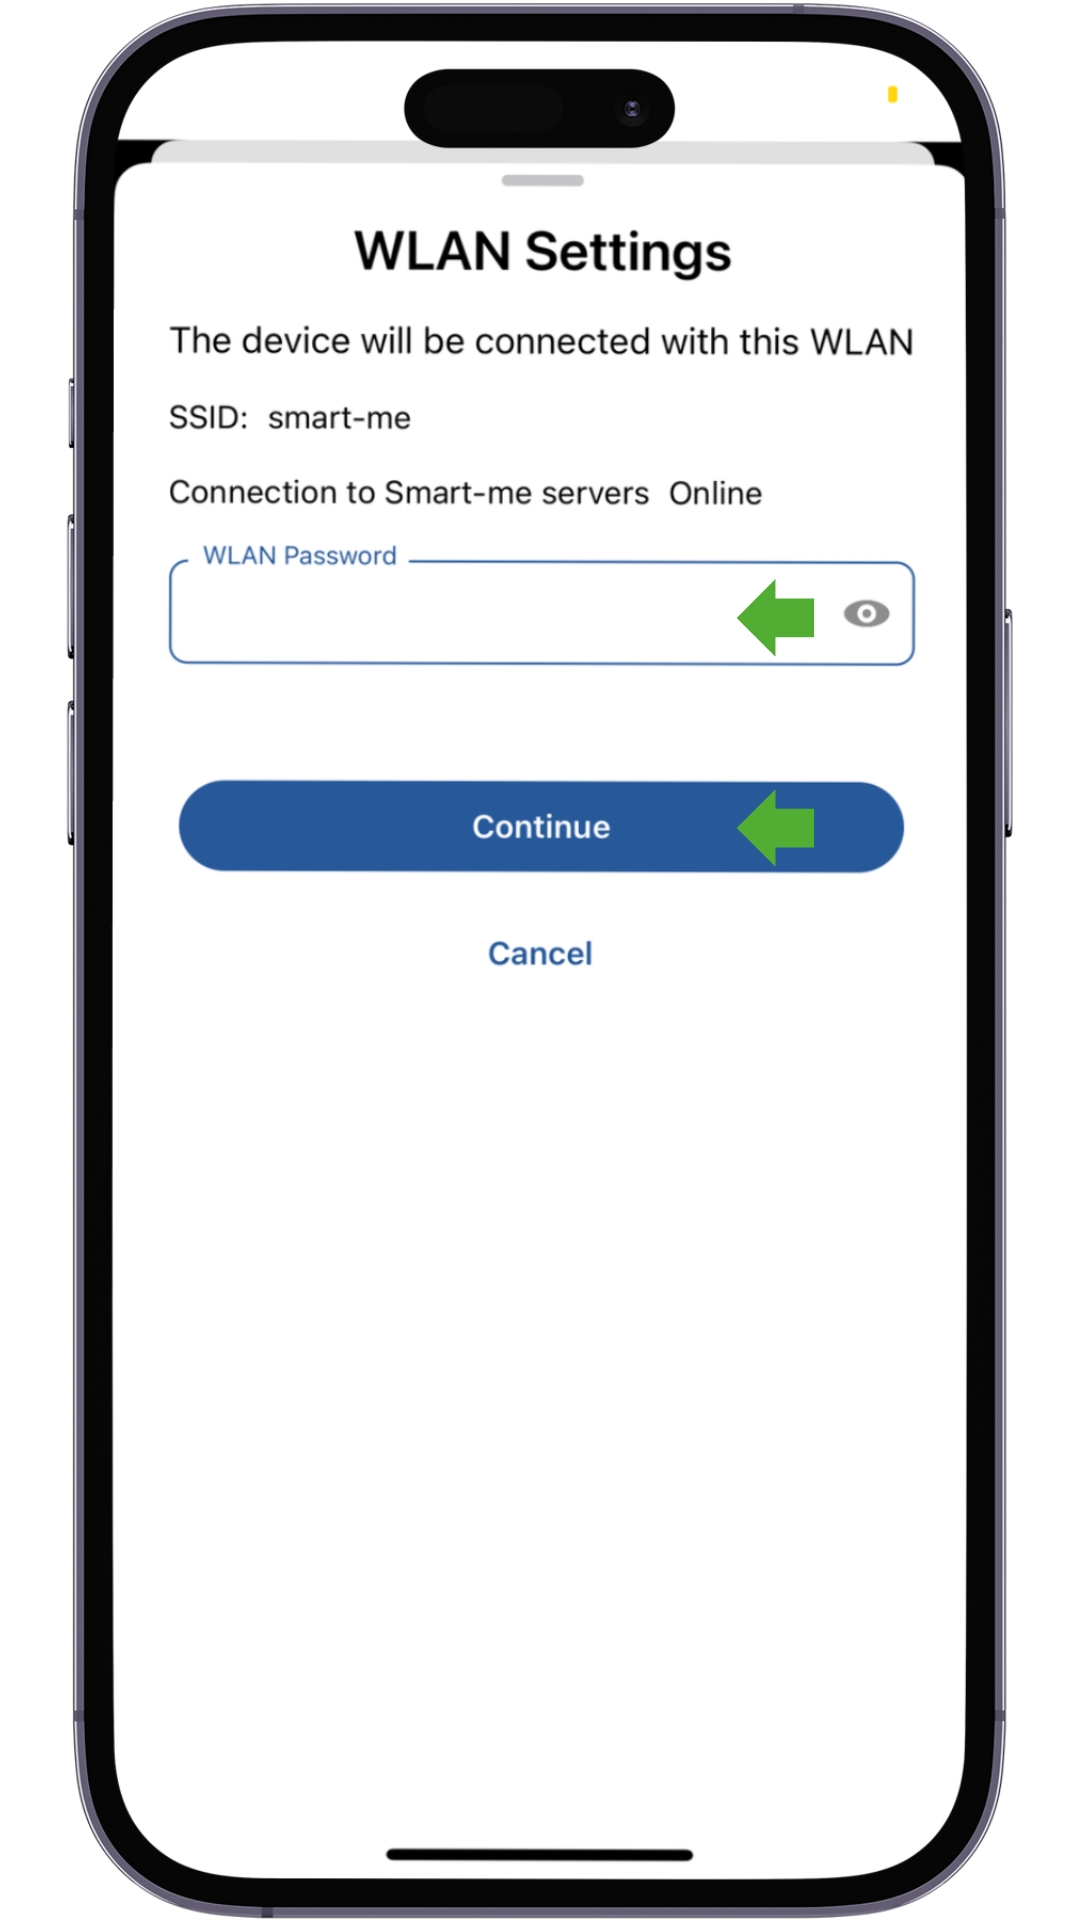
Possible problems: If the SSID shows <<unknown>>, location must be enabled and the smartphone must be connected to a WiFi network.
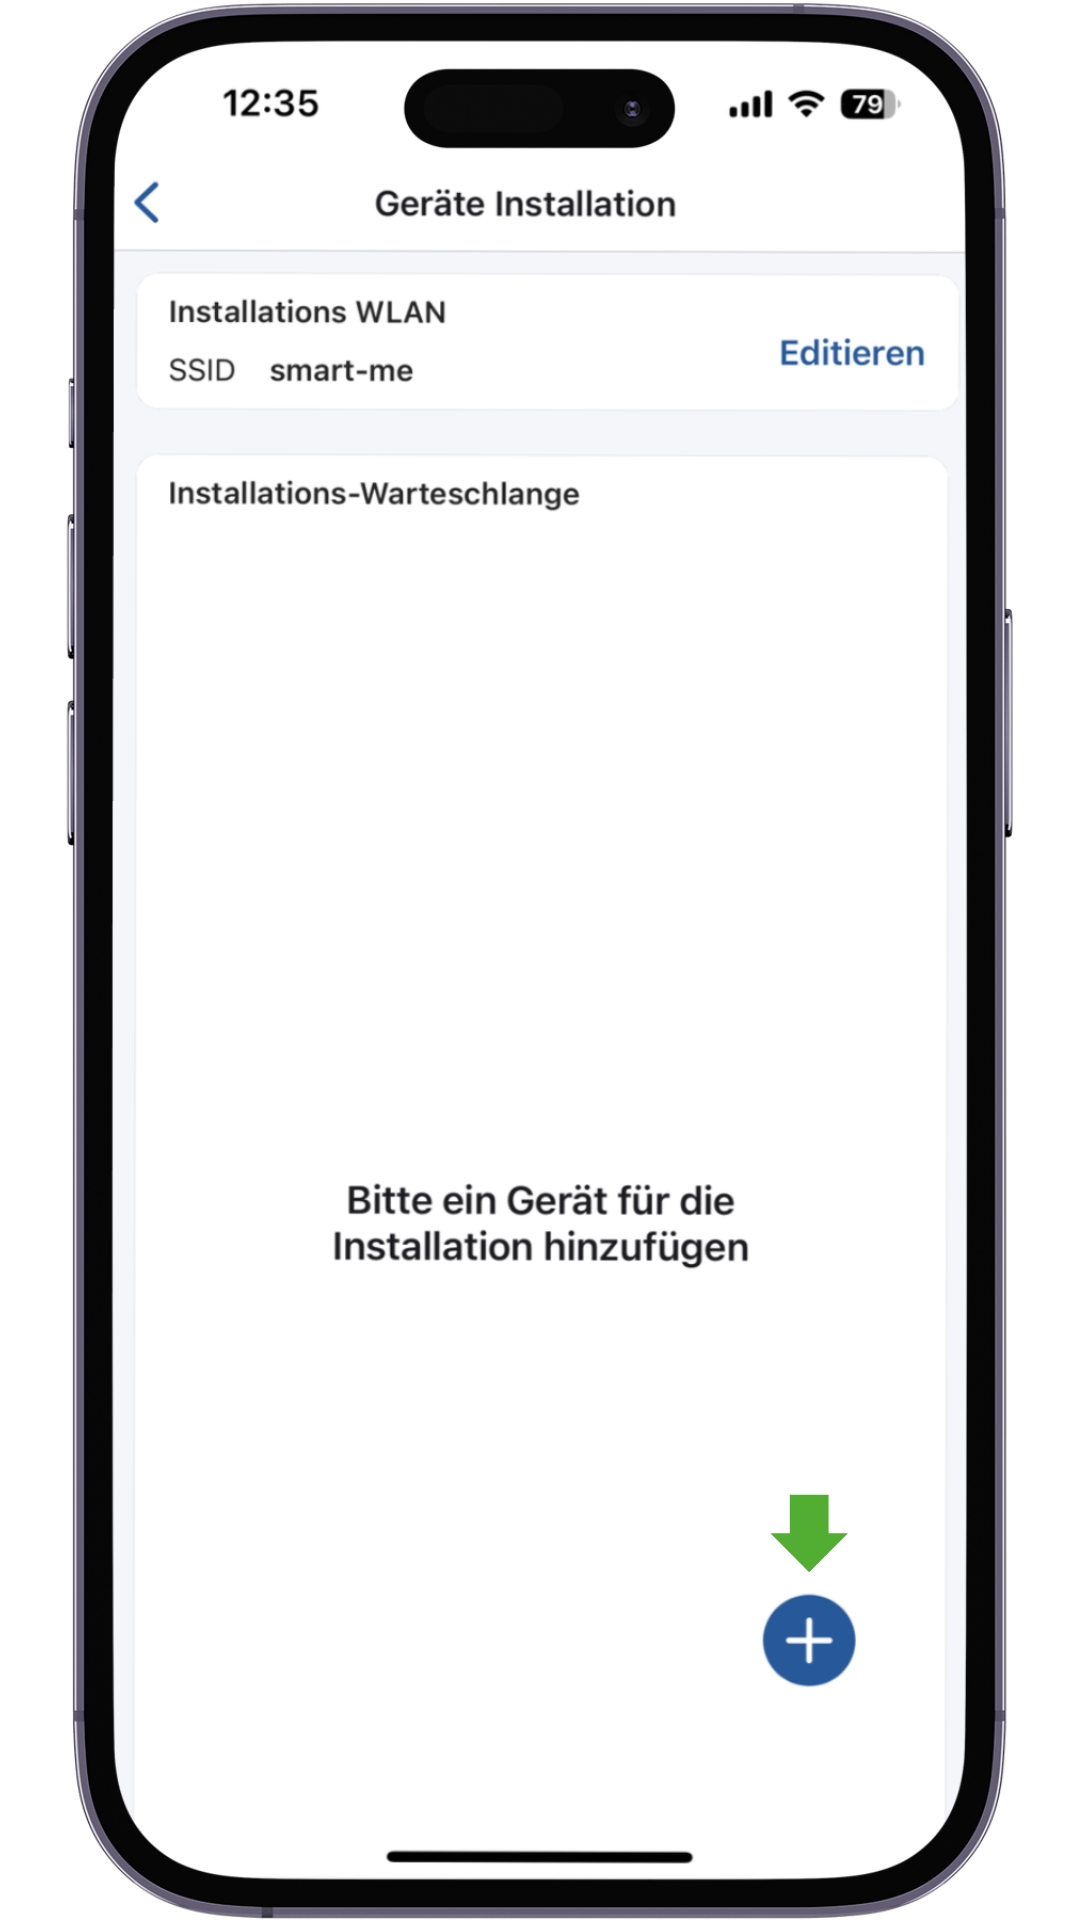
9. Click "Add device" („Gerät hinzufügen") (+)
10. Scan the QR code
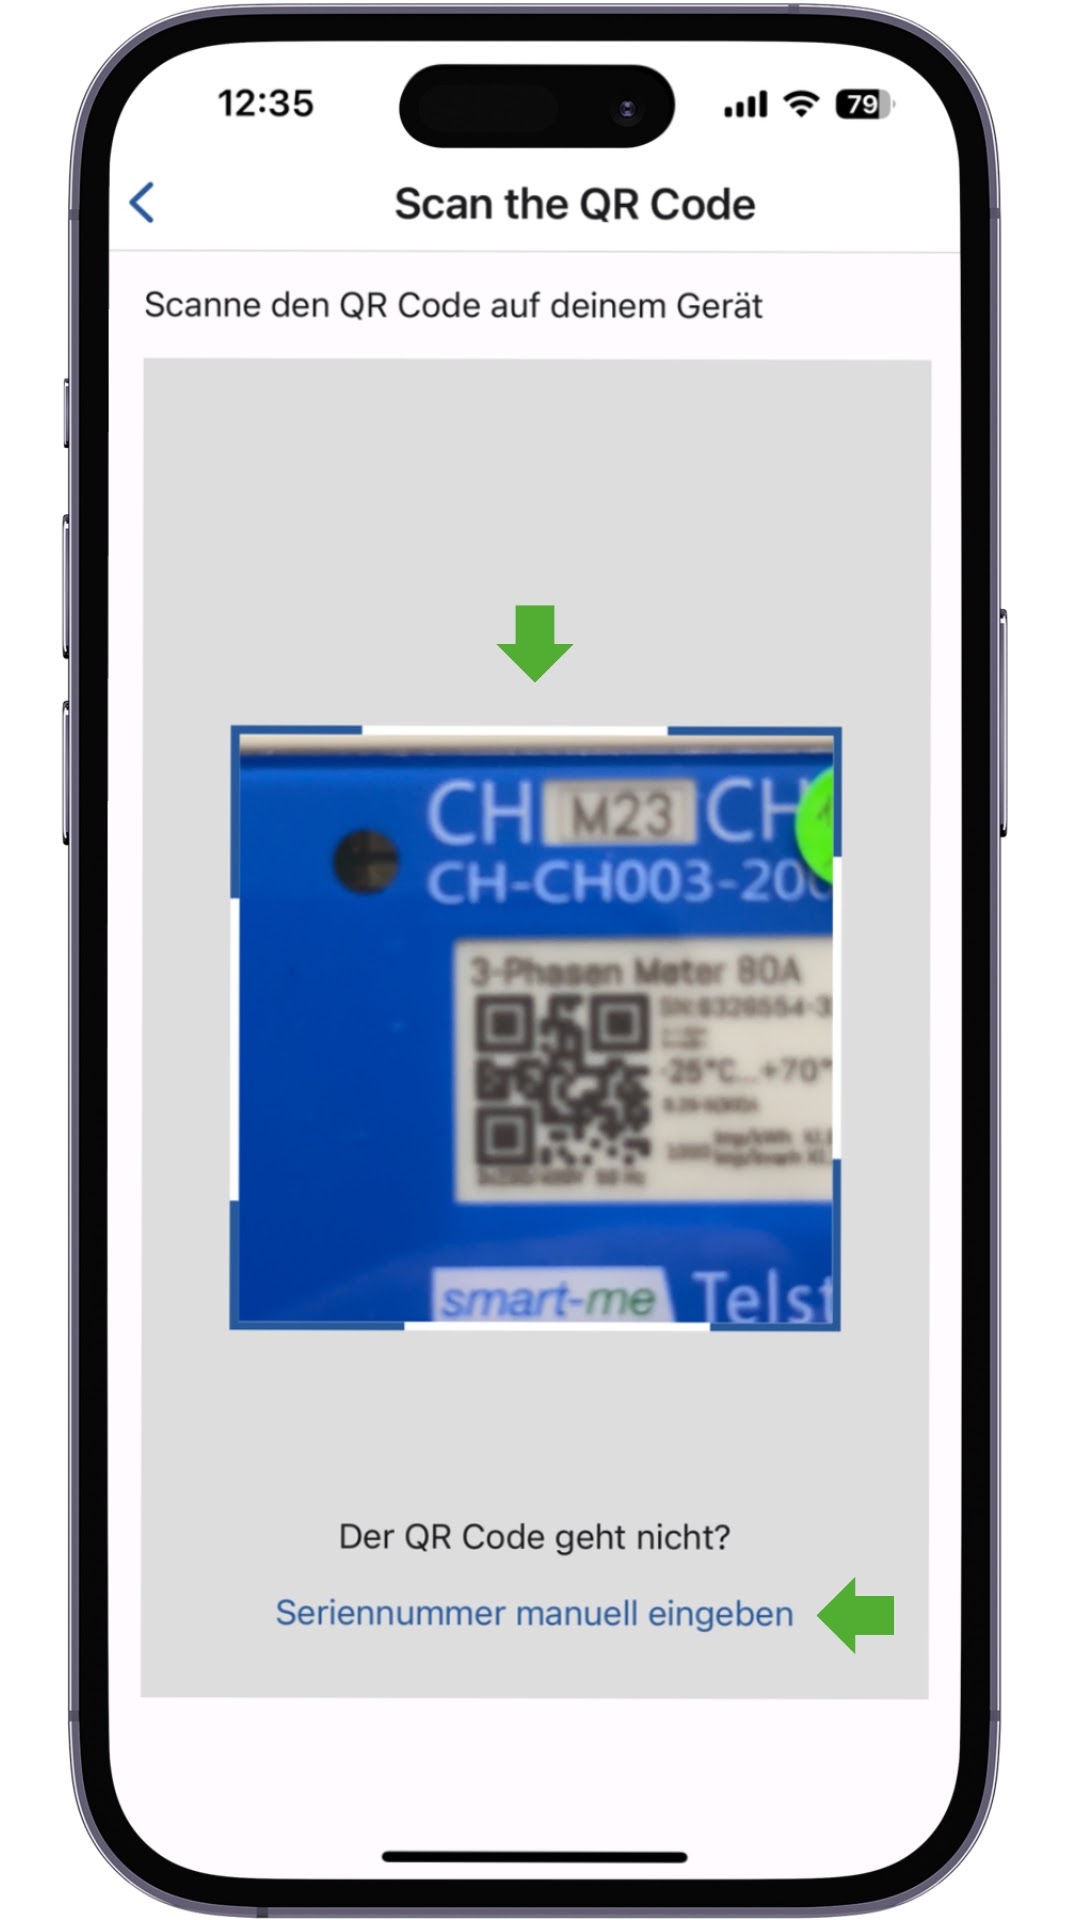
Possible problems: If the QR code is not recognised, the serial number can also be entered manually.
11. Connect to the meter's WiFi
12. Pico only: "Select connection type" („Verbindungsart auswählen")
13. Press the T1 button or scan RFID
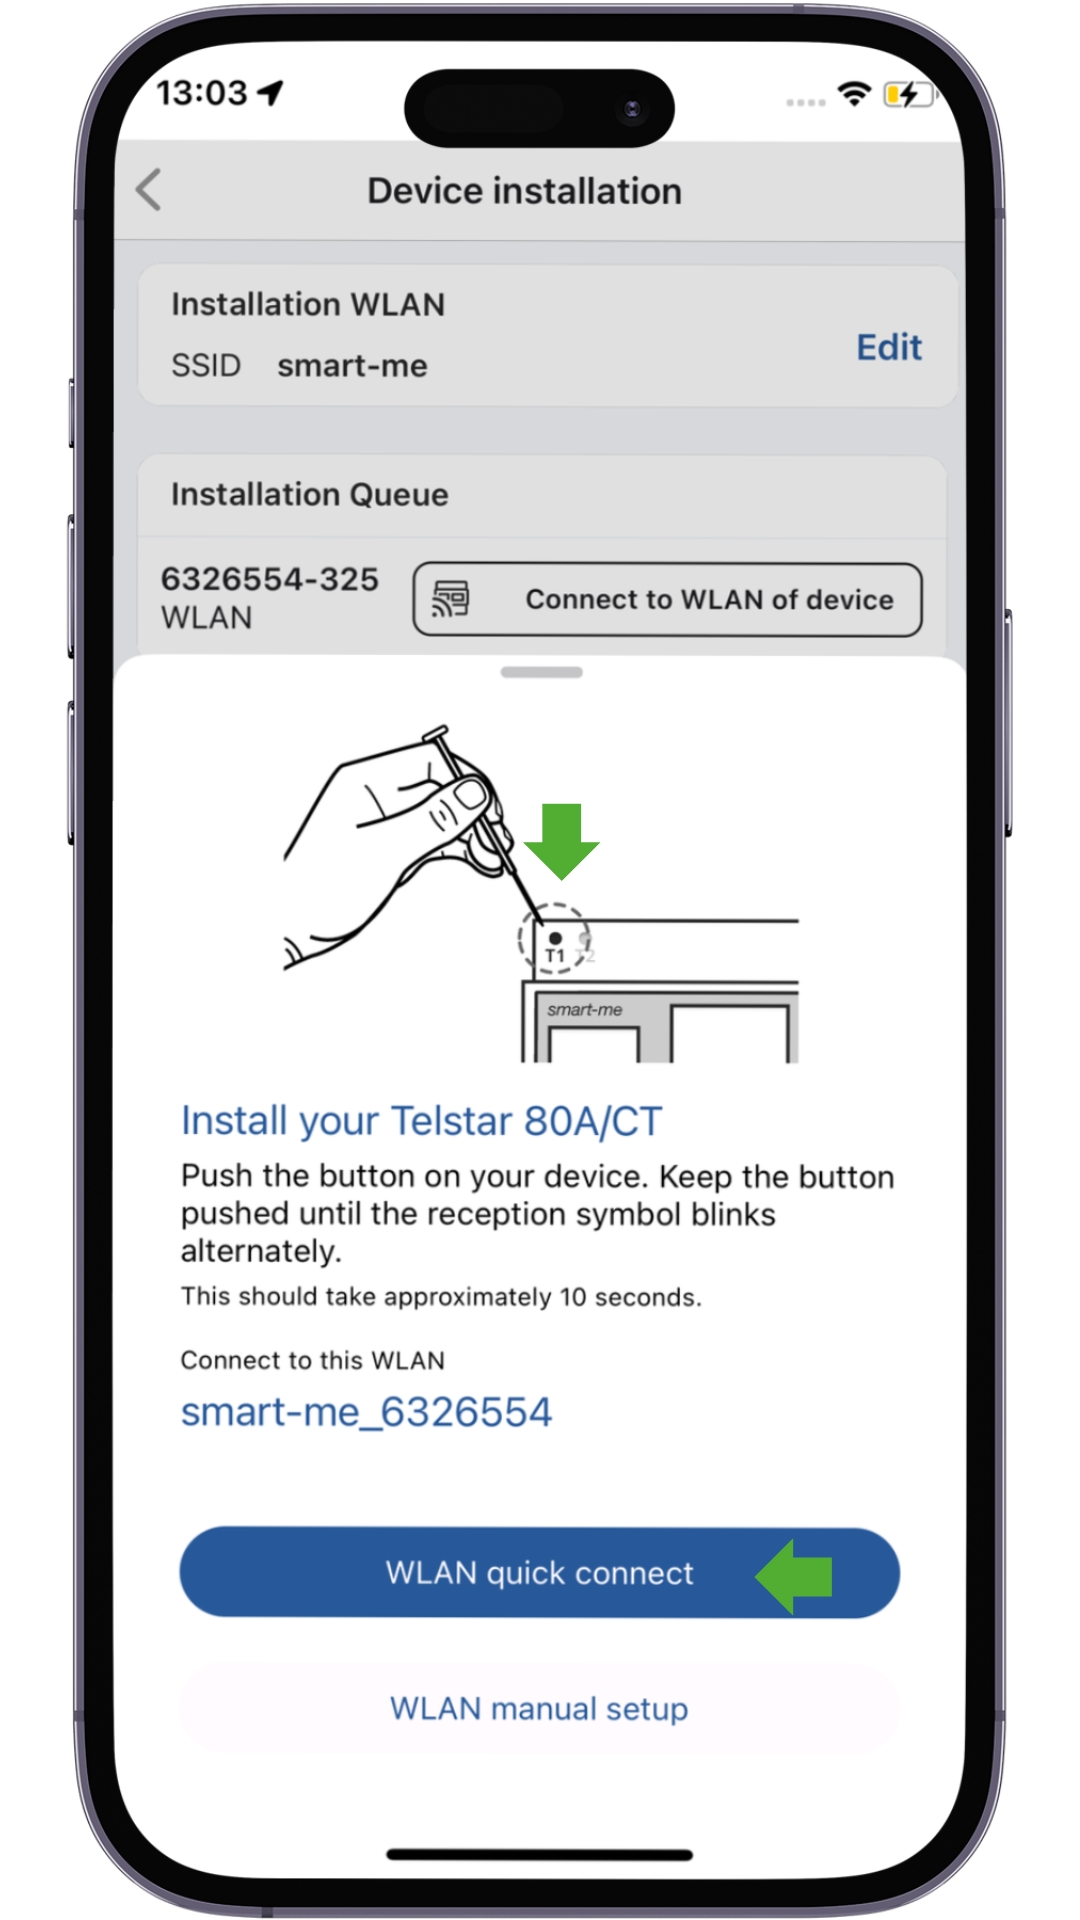
Note for Pico: You have 15 minutes per Pico to complete the installation. After that, the Pico must be restarted and the process started again from the beginning.
14. Wait until the connection is established
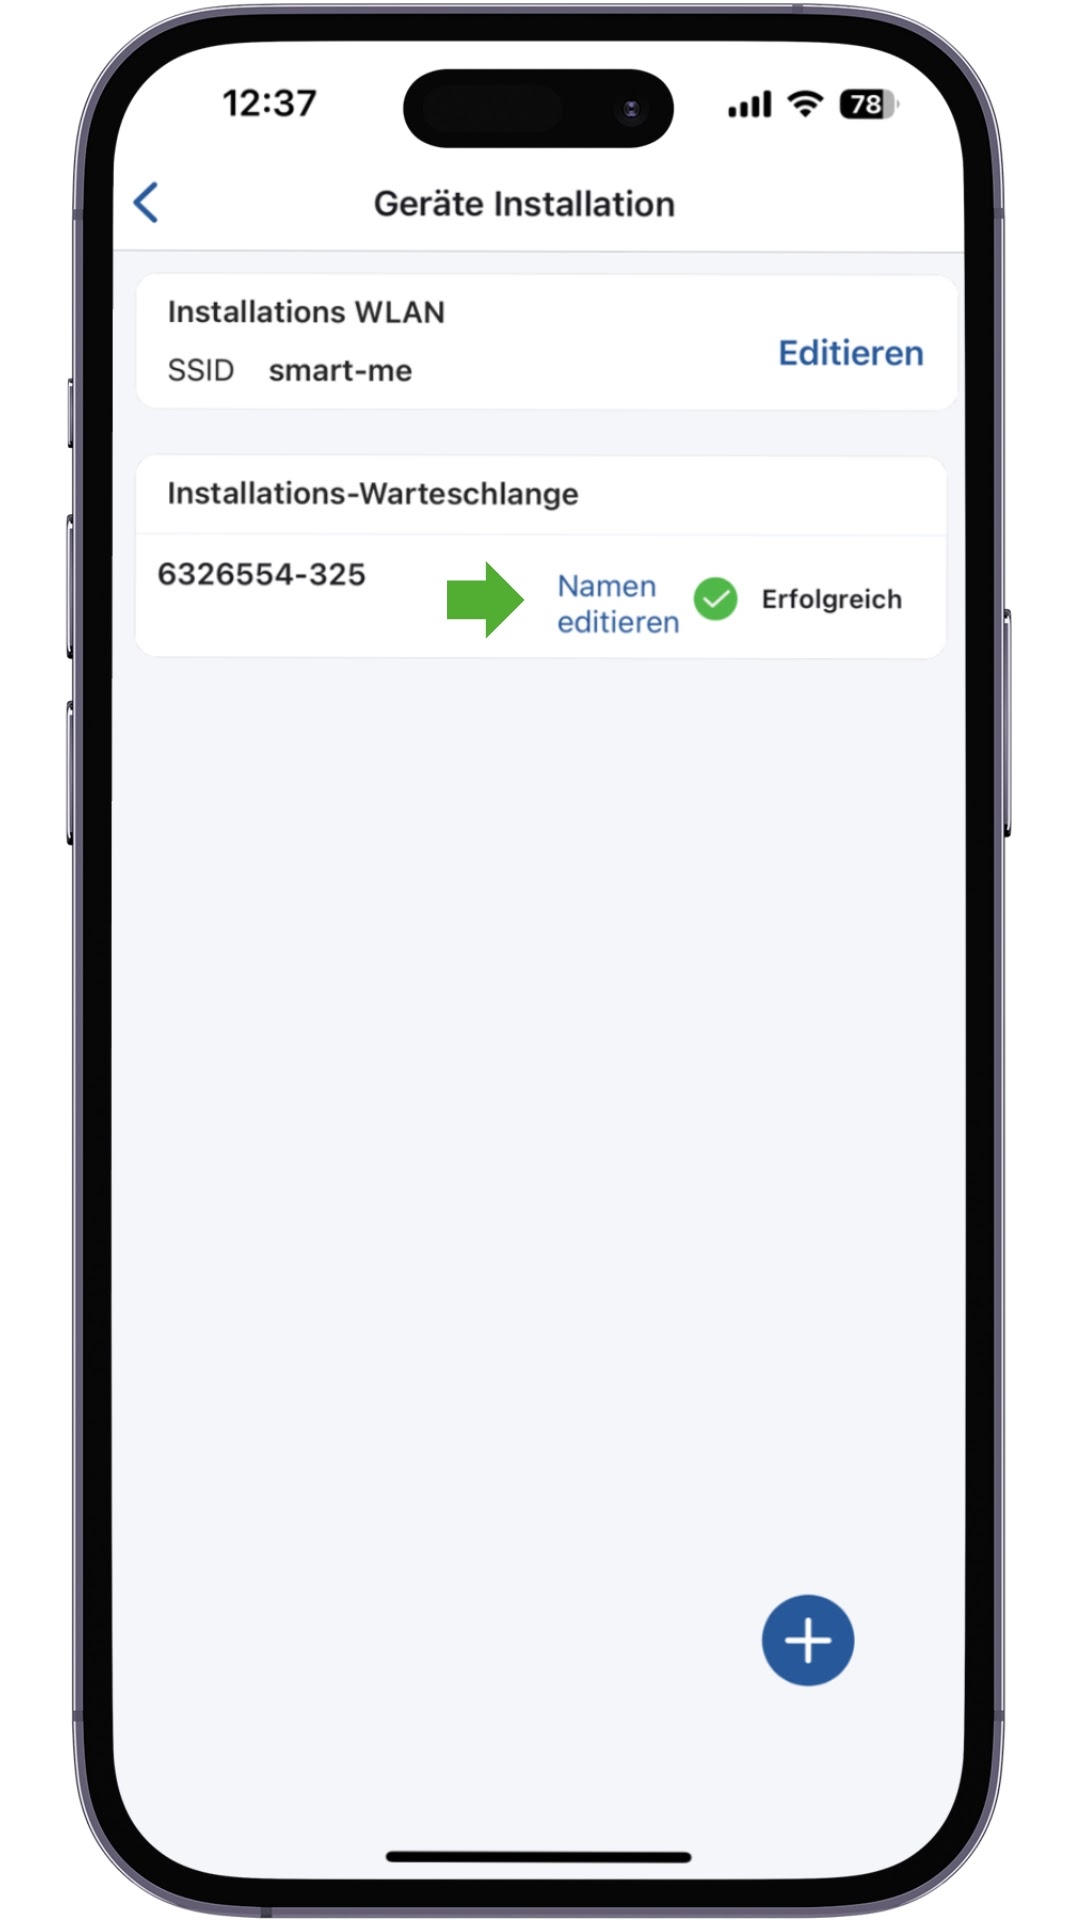
Device-specific settings
Telstar CT
Set the transformer ratio
-
Select and edit the CT meter
-
Enter the transformer ratio
-
The transformer ratio can be locked. This protects against unwanted changes by unauthorised persons. To unlock the transformer ratio, the device must be installed again with the smart-me app.
Note:
The transformer ratio does not change any historical data. This step should therefore be carried out immediately after commissioning.
M-Bus Gateway / Sirius
Instructions for both M-Bus Gateways
Hardware installation steps:
-
Install the device (wire the M-Bus, apply voltage)
-
Complete the installation using the app according to the instructions. (Link the hardware to the WiFi and the target account. WiFi 2.4GHz)
-
Under Configuration in the app or on the desktop, start the "automatic scan" ("automatischen Suchlauf") to find the devices.
The commissioning of the heat and water meters, on the other hand, is still carried out by the supplier (e.g. Neovac, Ista, GWF, Techem etc.). In most cases, these companies connect their own M-Bus master in the technical room so that they can check whether the meters are reachable on the M-Bus.
A commissioning report is then created, and only after that is our M-Bus Gateway reconnected.
With the corresponding documents, the individual meters can then be assigned to the correct apartments in the smart-me Cloud and the configuration can be completed.
The following information is required
-
List of all installed meters
-
M-Bus address (we only need the secondary address, the primary address is not relevant for us)
-
Assignment to the apartment (apartment designation)
-
Meter type (heat, domestic hot water or cold water etc.)
Important: The secondary address must be unique per smart-me account; in addition, for combined heat/cooling meters, the combination of the last 4 digits must be unique within the account. The easiest way is to use the device serial number.
Result of the automatic scan
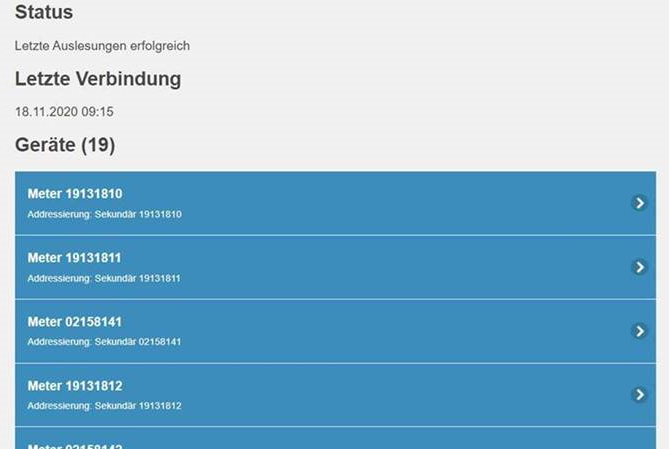
Automatic meter creation after the scan (takes a few minutes)

Numbering for combined meters
The M-Bus Gateway only recognises one meter at a time based on the secondary address, which is usually also listed on the acceptance report.
The combined meters are then displayed separately in the portal. For this application, smart-me uses its own numbering logic.
All meters that are not relevant for billing can be deactivated to save licence costs. Deleting them is not effective, as the meter will keep reappearing.
If a meter contains more than 1 meter, they are numbered as follows:
-
Main meter = secondary address from the M-Bus Gateway list (e.g. 71440145)
-
Additional meters = secondary address of the main meter, the first 1 or 2 digits are deleted (e.g. 7) and a number is incremented at the end (e.g. 14401451,14401452).
-
Sub-meters = these contain the last four digits of the main meter (e.g. 0145) and a four-digit sequential number at the end (e.g. 01450001)
Note on leading zeros: If a meter has e.g. the number 1000017, the leading zeros are not taken into account after truncation, i.e. e.g. 000017, and are appended at the end, e.g. 1700001


M-Bus Gateway: search for devices
Further configuration must be done in the web portal
Edit
- Change the interval. The M-Bus requires 10 seconds per device for reading.
Start the device scan on the M-Bus Gateway
-
Click the gear icon (Settings) at the top right
-
Search devices (Geräte suchen)
-
Confirm the search with "Yes" ("Ja")
Note: The search can take several minutes.
Gateway does not find all meters
-
Run the scan again (1-2x). The meter may not always be found during the first scan.
-
You can find further causes on the page M-Bus gateway failures
Gateway finds more meters than were installed
-
Usually during commissioning: Depending on the M-Bus meter, it may create several sub-meters. These can be recognised by the serial number being shifted one digit to the left, followed by an ascending number, starting with 1. Example: main meter 00200001, sub-meter 02000011
-
You can find further causes on the page M-Bus gateway failures

M-Bus Gateway: prevent detection of new devices
How is the option enabled?
-
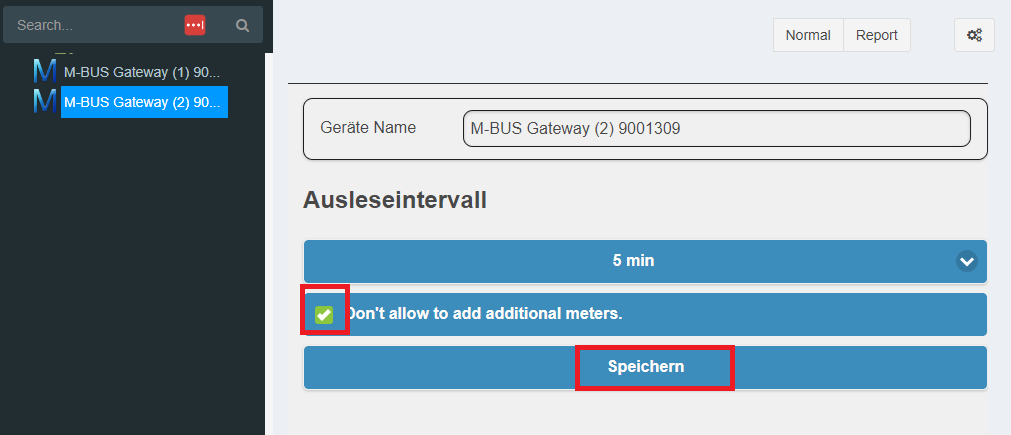
Select the M-Bus Gateway.
-
Select the M-Bus Gateway gear icon (top right). Note: Do not select the upper gear icon, which is used for configuring the meters, but the lower one.
-
Edit
-
Tick "Don't allow to add additional meters".
-
Save
What does this option do?
- Enabling the option "Don't allow to add additional meters" prevents devices that do not yet exist in the cloud from being saved.
What must be taken into account?
- If new devices are added, this option must be disabled again before the search.
When is this option recommended?
-
When M-Bus devices that do not exist at all keep appearing in the portal.
-
For preventive reasons :-)
In which cases can this happen?
- In the event of data transmission errors. This occurs more frequently if the M-Bus cable is too long and the quality of the data transmission decreases as a result, or if the cable is poorly shielded or exposed to external interference.
Technical explanation
- The standardised M-Bus protocol only has 1 byte for the checksum. The checksum is intended to detect certain errors in data transmission. Unfortunately, 1 byte is not much and can repeatedly result in a faulty data packet being considered correct and valid. In some installations using M-Bus Gateways, this repeatedly causes corrupt packets to be classified as correct and valid, which are then detected and added as a new M-Bus device in our cloud. The account then drops from Professional to Basic, as licence coverage is no longer guaranteed.
Pico EV Charger
Check the WiFi connection
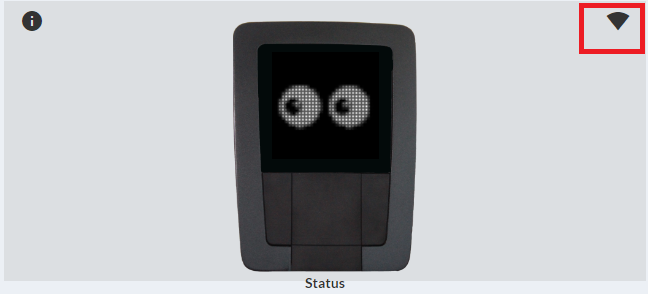
After the Pico has been installed, an icon appears in the top right corner indicating the connection type.
If the Pico is to be connected via WiFi, it is advisable to briefly check whether the icon is a WiFi symbol and not 4G.
If 4G appears even though the Pico should be connected via WiFi, the Pico must be reinstalled. This can happen if a step was not carried out correctly during installation, e.g. the WiFi password.
Pico Configuration & load management
Configure the individual design and behaviour of the Pico and its load group membership.
Configure the Pico in a higher-level load management for the entire building or site.
Tips and tricks
Commissioning multiple devices
In this step, you can commission several meters at the same time to speed up commissioning when there are many meters.
Logging out
-
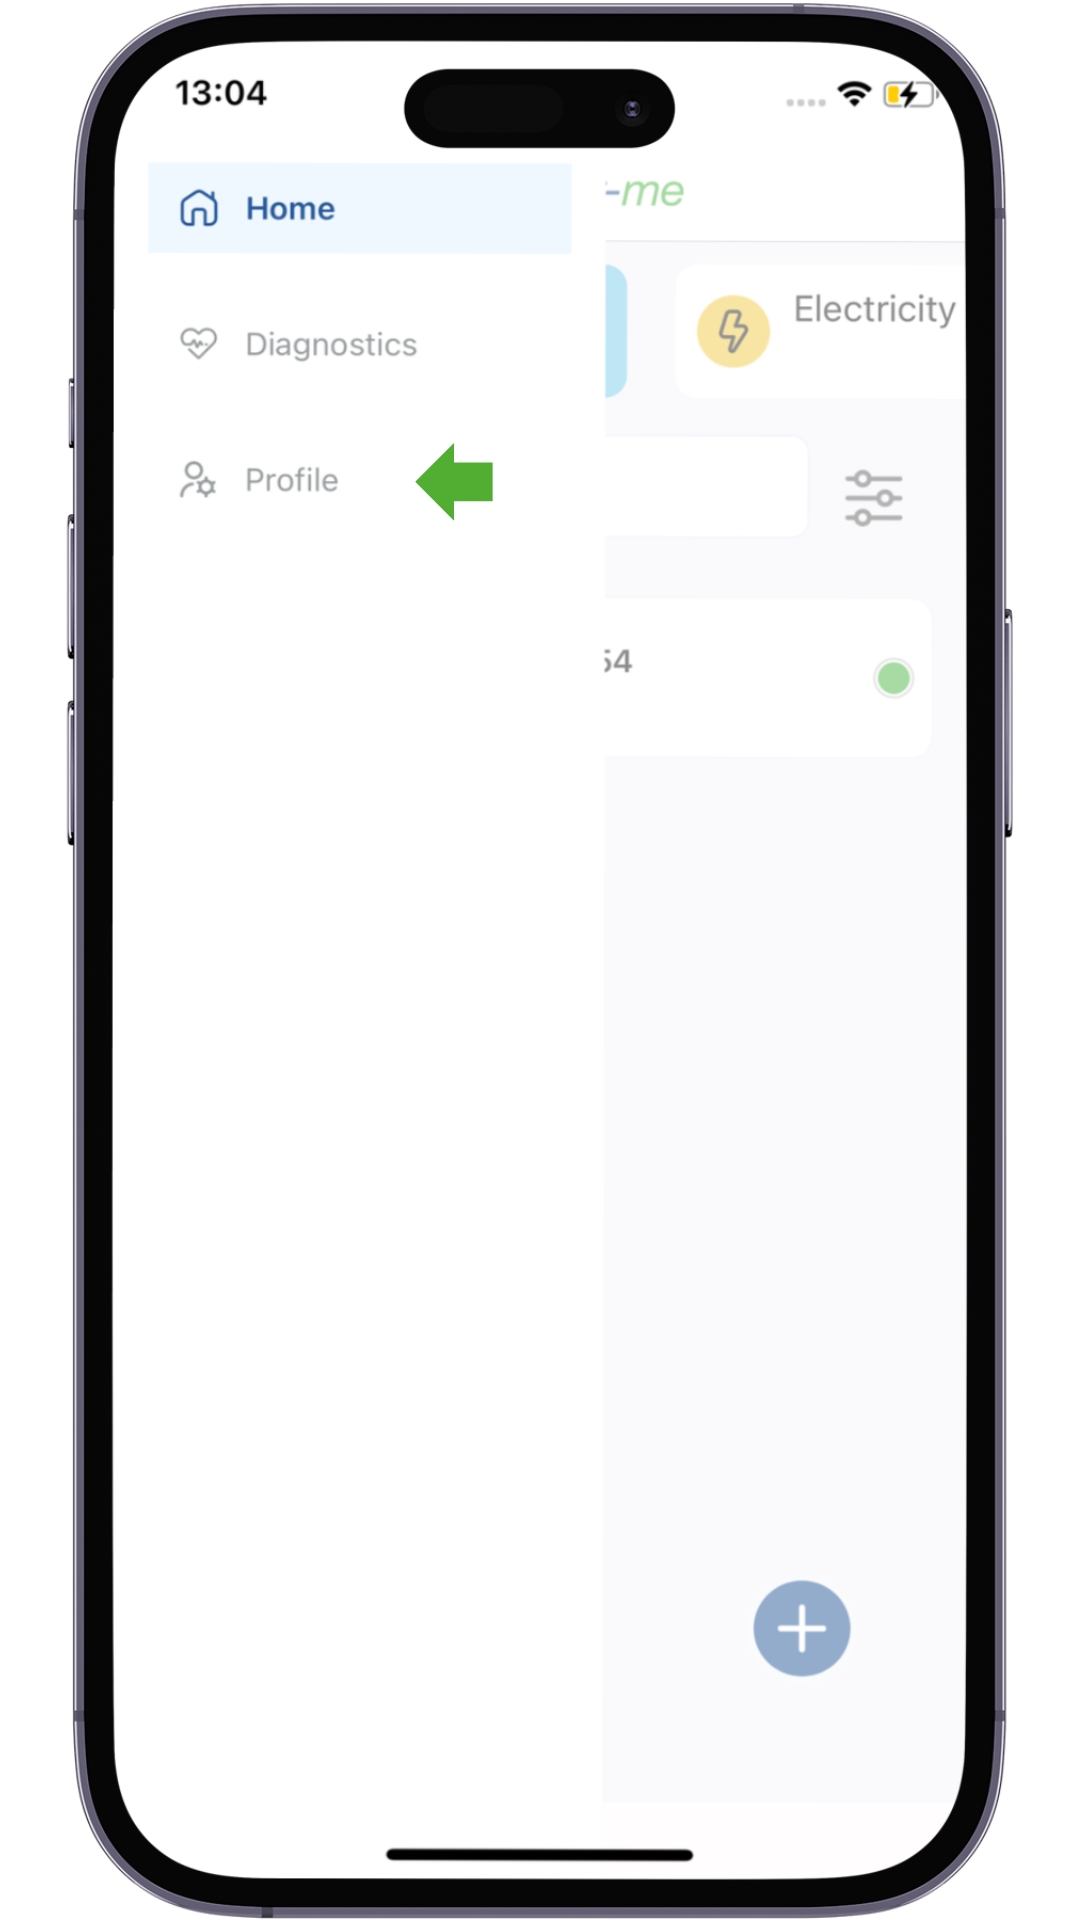
At the top left, tap the three lines and select Profile (Profil)
-
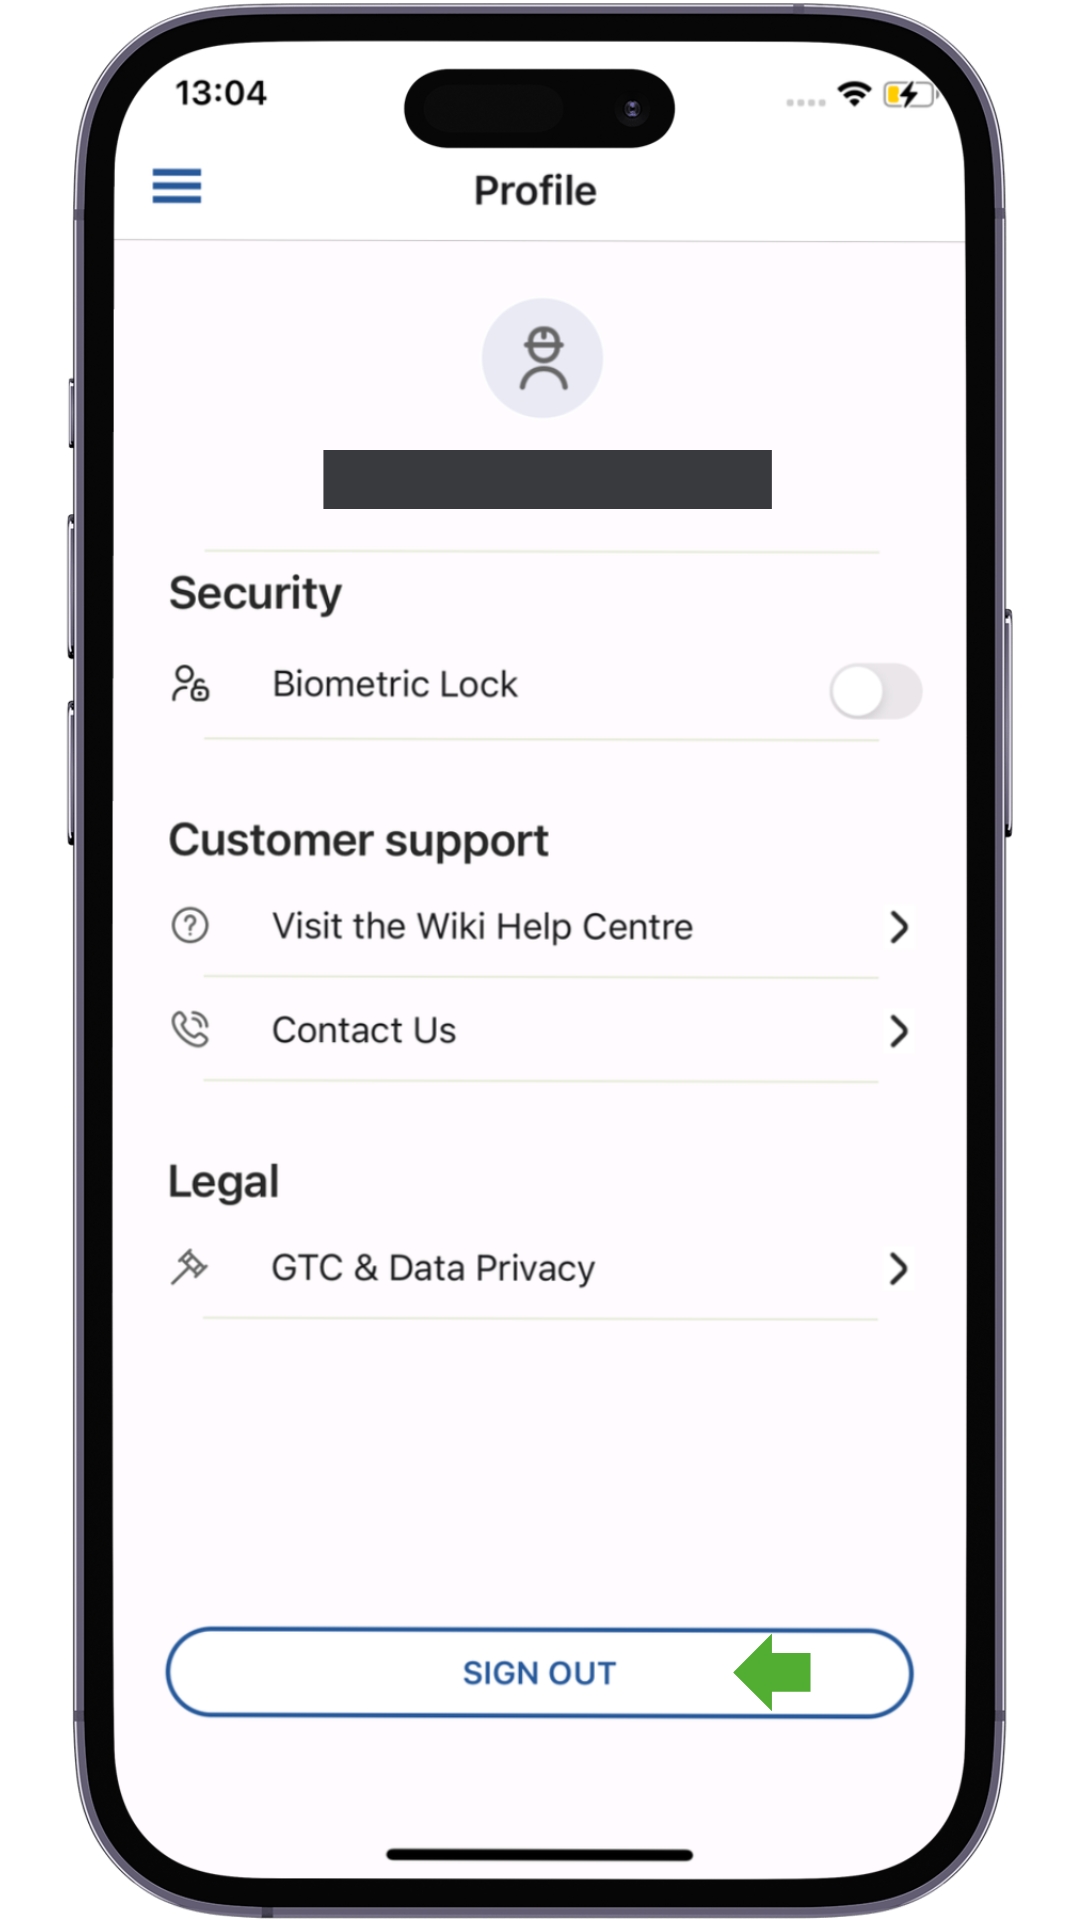
At the bottom, select Log out (Ausloggen)
-
Logged out
Installation failed
If the installation fails and you want to try again, please close the app completely and then reopen it. This ensures that no cached information is used.
FAQ
The internet provider is being changed, what do I need to do?
If the meters are connected to a technical WiFi network and/or a dedicated access point, the SSID and password usually do not change. In that case, changing the internet provider is usually not a problem.
If the SSID and password of a private WiFi network are used, there are two options:
-
Solution 1: Set up a guest WiFi network on the new router with the same SSID and password as the old one. The meters will then automatically connect to this WiFi network, which is identical to the old one.
-
Solution 2: Re-register each meter individually so that the new data is stored locally on each meter. The installation is carried out exactly like a new installation. Under no circumstances may the meter be deleted, as otherwise all historical data will be lost. When reinstalling, our cloud environment recognises that the serial number already exists in the account and simply adds the new values.
How can I restart (reboot) a device?
All devices can be restarted by interrupting the power supply.
3-phase meters: Press T1 and T2 simultaneously for 10 seconds.
Pico: In the portal, select the gear icon at the top right, advanced actions, restart. Only works if the Pico is online.
Kamstrup modules: Remove the module from the meter, wait 10 seconds and plug it back in.
M-Bus Gateway and single-phase meters: These devices can only be restarted by interrupting the power supply.
Can I use my device with multiple WiFi networks?
Yes, the smart-me device (except the Pico charging station) stores up to 3 different WiFi networks. You only need to install it once on each network, after which the device automatically selects the network with the best wireless connection.
Can I reset the meter reading to zero?
No, as our meters are used for billing, it is not possible to reset them.
Where is the WiFi password stored?
The WiFi password is stored exclusively on the smart-me device and is never transmitted to a server.
Are the settings and meter readings saved in the event of a power failure?
Yes, the device saves all settings and values in the event of a power failure. As soon as the power supply is restored, the device automatically connects to the WiFi network and returns to the state it was in before the failure.
How can I add a new WiFi network without losing the existing data?
To add another network, the device must be properly installed with the smart-me app. If it is not deleted from the cloud beforehand, energy data and configuration settings are retained.
Can the stored WiFi information be deleted?
The WiFi information is only stored on the device. The data can be deleted as follows:
-
Press the button on the smart-me device for 10s. For Pico, the RFID card must be held against the device no later than 15 minutes after the restart (power off).
-
Use a smartphone to connect to the smart-me WiFi (the name of the WiFi network is smart-me_XXXXXX, where X stands for the serial number of the smart-me device)
-
Use a browser to connect to the IP 192.168.1.1.
-
Select the unwanted WiFi network, press remove and restart the device.
How do I find out the MAC address of my smart-me device?
There is no direct way to find out the MAC-address. If you have a Professional licence, you can enable DNS in the advanced settings of the smart-me device and select the Internal IP option. The IP can be determined by pinging the DNS name; it can then be compared with the IP / MAC table on the router.
Can the mesh network be disabled?
3-phase meters Telstar and Telstar CT create a mesh network. This cannot be disabled.
Can I move a device from one smart-me account to another?
-
The historical data cannot be moved.
-
However, the device can be installed in another account by reinstalling it.
With which meter reading is a smart-me meter delivered?
0
What happens when I deactivate a meter?
All data already stored in the cloud is retained. After deactivation, no further data is stored. No licence costs are charged for deactivated meters.
Can a proxy be configured on the smart-me devices?
No